[ad_1]
Planning to journey to the United States for the primary time? You’ve come to the best place! Welcome to our step-by-step US Visa Application Guide for Filipino vacationers. In this text, we’ll stroll you thru the complete software course of from reserving an appointment to nailing the interview on the US Embassy.
For Filipino nationals, any plan to journey to the United States begins with a visa. And the US visa is without doubt one of the most extremely coveted for a lot of causes. First, the US has an enormous Filipino diaspora that the majority of us know somebody there. Second, the American affect on Philippine tradition is plain. Many of us dream of stepping foot in New York or Las Vegas or California. And lastly, it’s also a strong visa to have. When you have got a US visa, you’re allowed entry not simply to the United States but additionally a number of different nations that in any other case require a separate visa.
It’s no surprise that at any given day, there’s all the time a protracted queue on the US Embassy in Manila. But for many people, the US visa isn’t notably straightforward to safe. That’s why we’re half-grateful and half-relieved after we lastly acquired ours. Yes, we have been simply granted a US B1/B2 visa. Here’s how I acquired it.
WHAT’S COVERED IN THIS GUIDE?
WHAT IS A B1/B2 U.S. VISA?
A B1/B2 visa is a non-immigrant short-term visa that may allow you to enter the United States for enterprise (B1), for tourism (B2) or BOTH.
You can use it to do any of the next:
- BUSINESS (B1)
Meeting with enterprise associates
Attending a convention, seminar or conference
Negotiating a contract or settlement
Settling an property - TOURISM (B2)
Vacation (leisure/vacation)
Visiting relations or buddies
Attending social occasions (live shows, festivals, reveals)
Medical remedy
You can’t use a B1/B2 visa to check, work, or keep for good within the United States.
A B1/B2 visa is normally:
- multiple-entry
- legitimate for 10 years
Yes, the 10-year validity is the most effective half. Once you’re granted a visa, you gained’t must renew or apply once more for a very long time.
I utilized for a B1/B2 visa, so each factor you’ll learn on this article is about that particular kind of visa. If you’re making use of for a piece visa, pupil visa or inexperienced card, we gained’t be of any assist as a result of they’re exterior our private experiences.
HOW TO APPLY FOR A U.S. VISA?
Here’s the total software course of when making use of for a US B1/B2 visa.
Note that Steps 1 to three are literally interchangeable. But I consider that how I organized it beneath is the order that makes essentially the most sense.
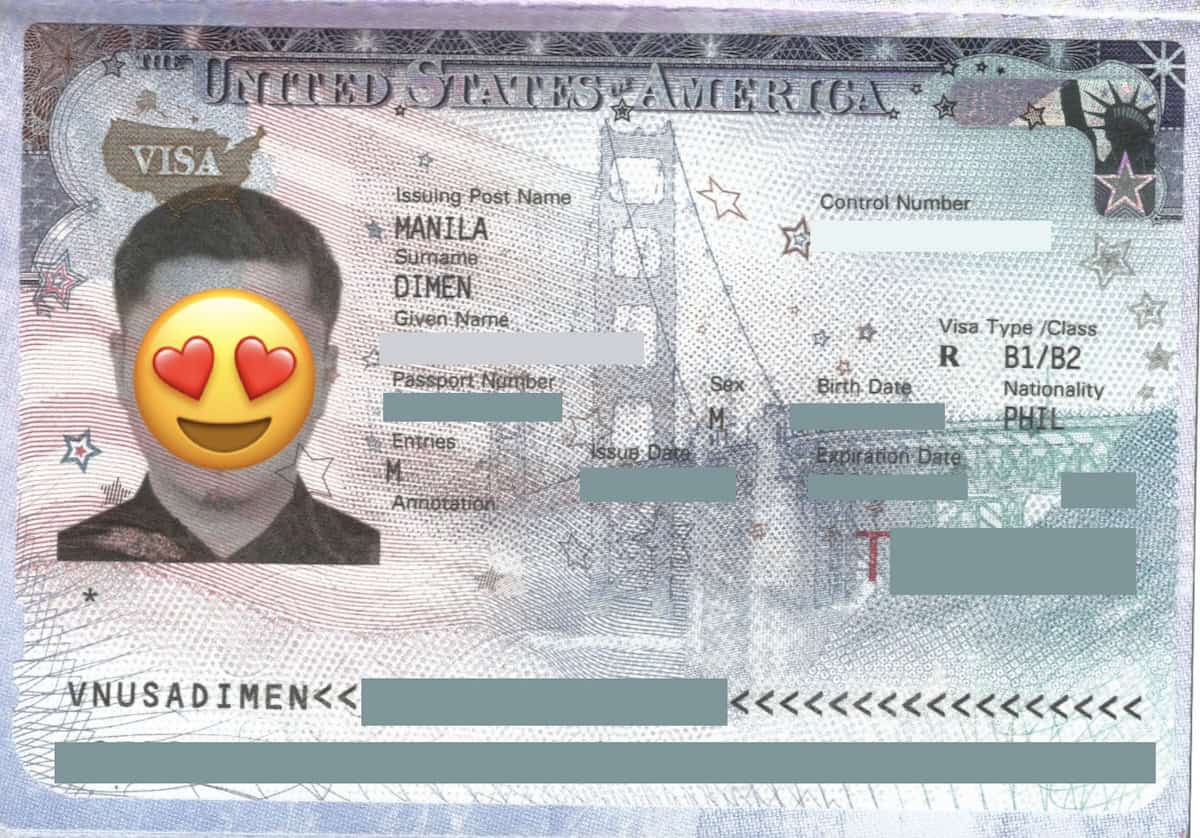
Step 1: Create a USTravelDocs.com account.
To join an account, go to this web page.
- Click NEW USER on the backside of the web page.
- Enter your e mail handle and full identify on the subsequent web page.
- Set a password.
- Click SUBMIT.
USTravelDocs.com is the official visa appointment service portal of the U.S. State Department. This is the web site the place you’ll ebook an appointment, however you don’t want to try this this early. You gained’t be capable to safe a slot till you’ve paid the visa price. For now, all it’s good to do is create an account.
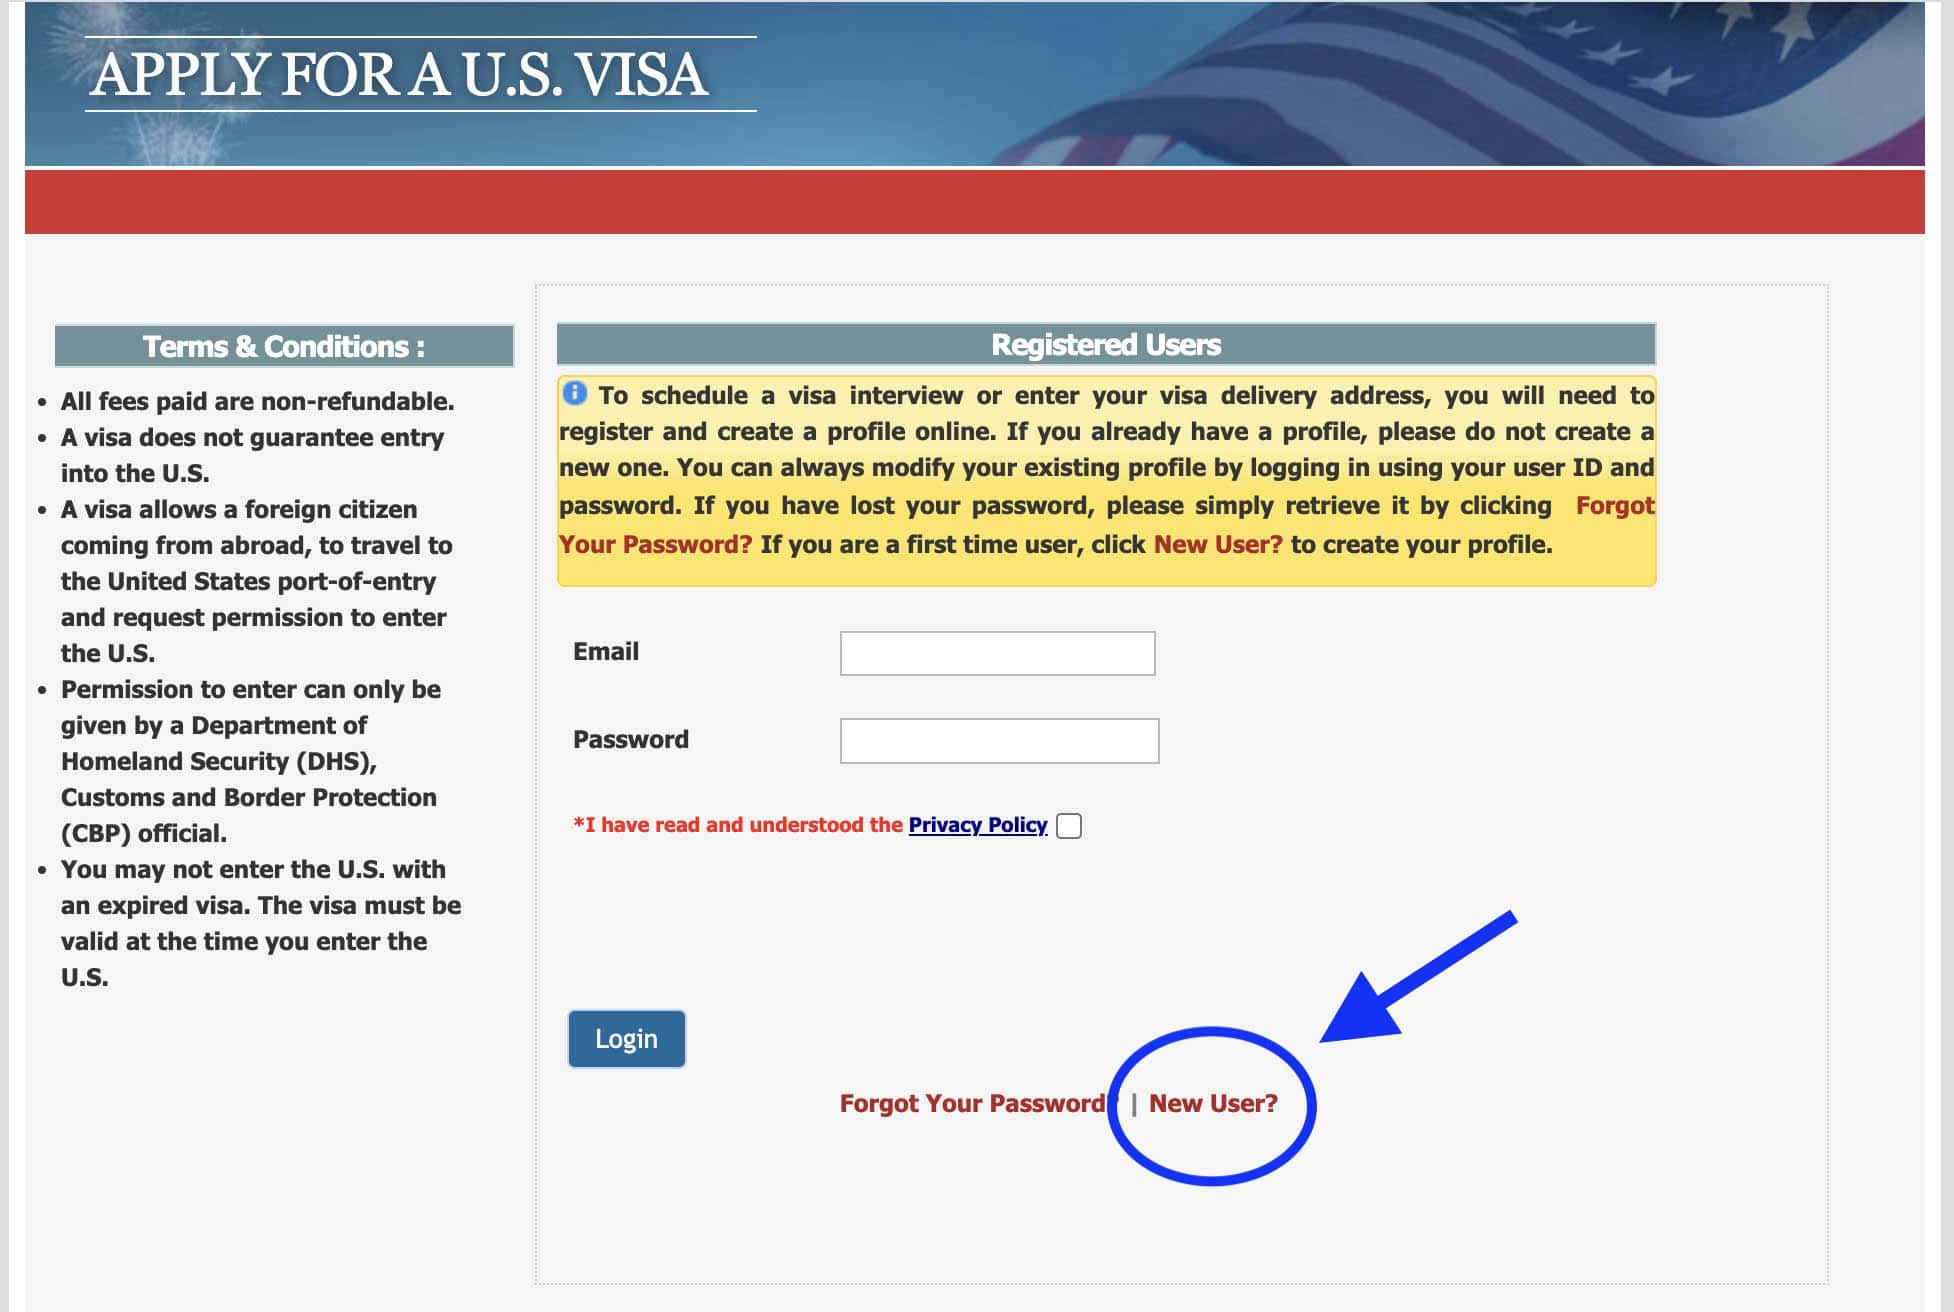
Why? Because as quickly as you have got an account, you’ll be capable to see the EARLIEST AVAILABLE APPOINTMENT DATE.
This is particularly necessary in case your journey dates usually are not versatile: say, you’re attending a marriage, a live performance, or a convention. Having visibility on the earliest obtainable date will let you gauge for those who’ll be capable to get a visa in time to your journey and resolve appropriately.
The very last thing you need is to pay the hefty visa price solely to search out that there aren’t any extra appointment slots earlier than your meant journey date.
Note: The earliest appointment date modifications every so often, when candidates ebook, transfer or cancel their reserved slots. So simply because there aren’t any slots in your goal month doesn’t imply there gained’t be sooner or later.
If all the pieces seems to be good, then proceed to Step 2.
Step 2: Accomplish the DS-160 Form.
The DS-160 type serves as your software type. To fill it out, go to to this web page.
Every visa applicant should full a DS-160 type. If you’re touring as a gaggle, every one among you will need to fill it out individually.
Follow these steps:
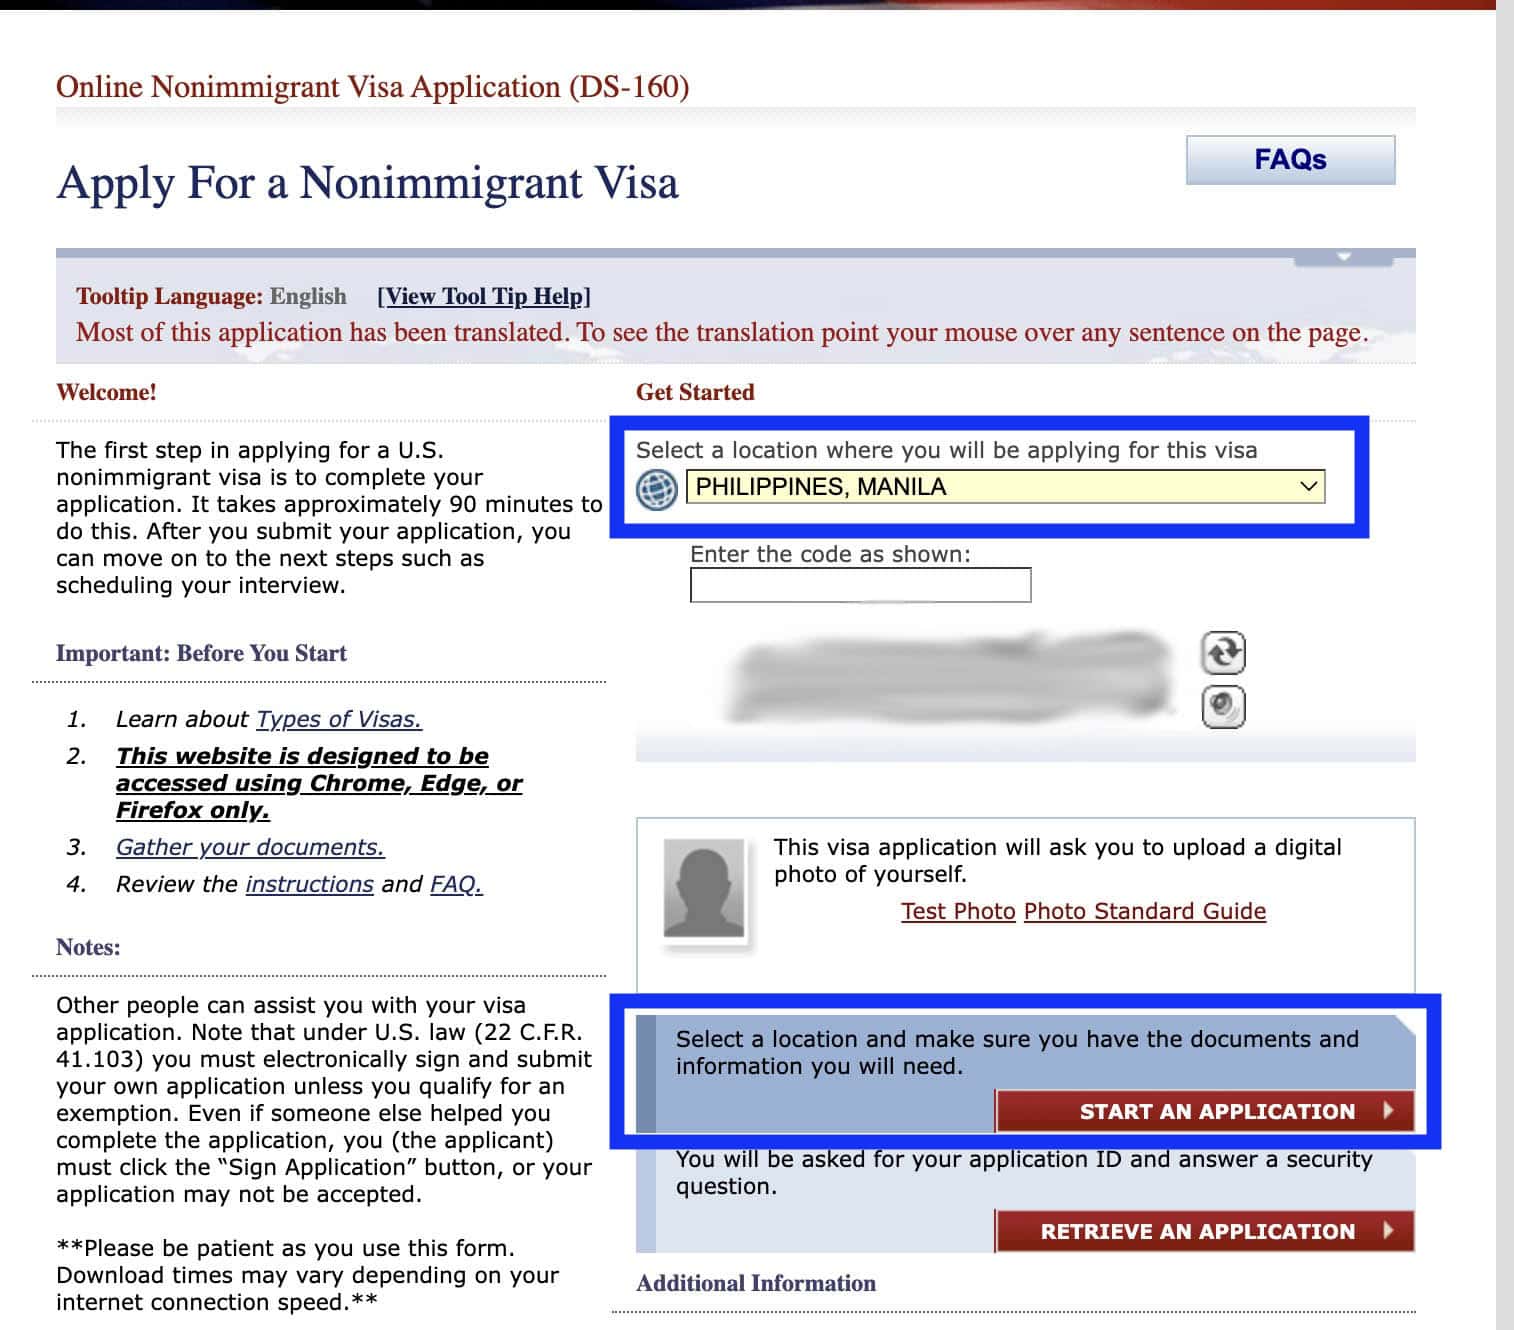
- Under LOCATION WHERE YOU’LL BE APPLYING, select PHILIPPINES, MANILA. Enter the CAPTCHA code beneath it. Then click on on the purple START AN APPLICATION button.
- On the subsequent web page, you’ll be assigned an APPLICATION ID.
- Select a safety query and enter a solution. DO NOT neglect your reply to this to keep away from getting locked out of your account.
Then it’s time to lastly fill out the DS-160 type. It’s a really prolonged type — with 10 pages — so allot loads of time. If you’re feeling such as you gained’t be capable to end, simply save your progress. Don’t rush it. And ensure that each reply is correct. These are the main points it’s good to put together:
- PERSONAL DETAILS. Name, start date, start place, and so on.
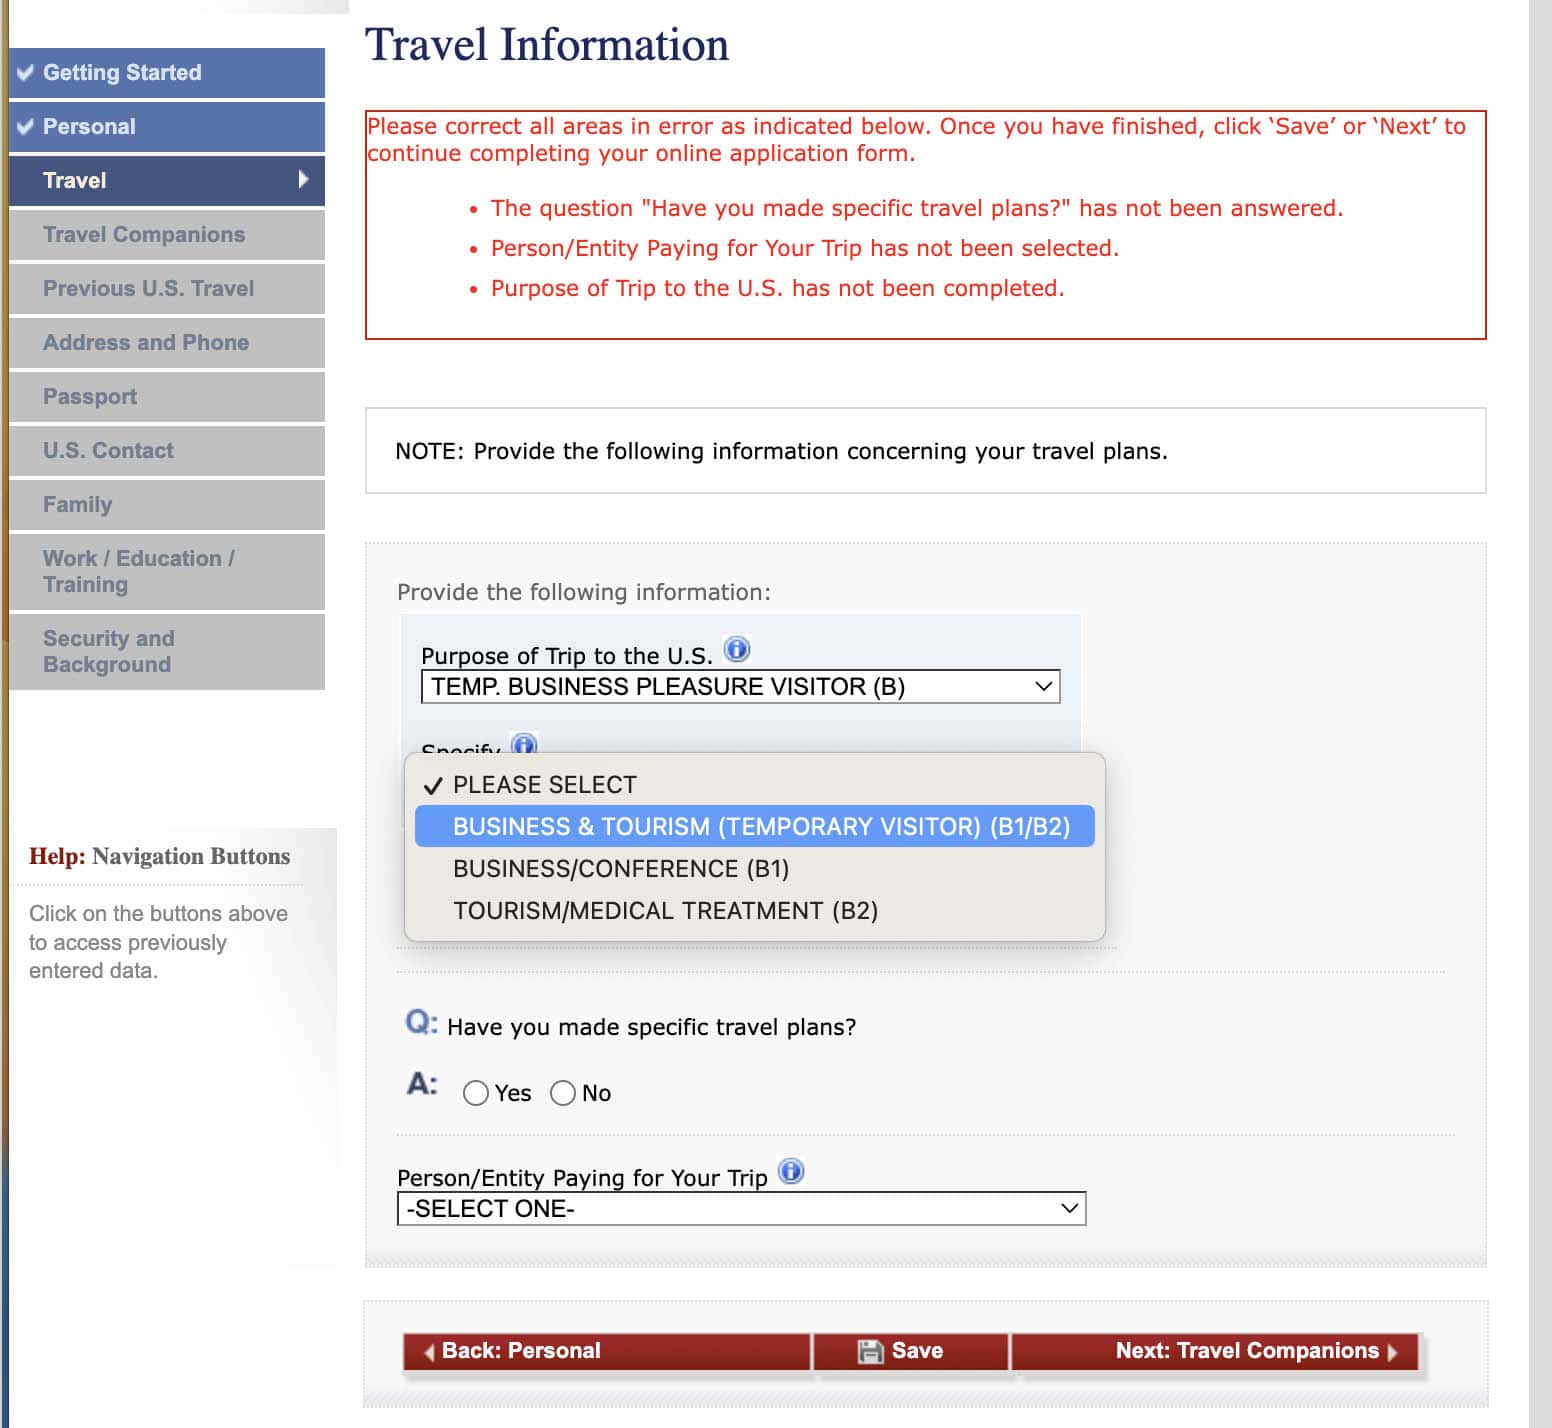
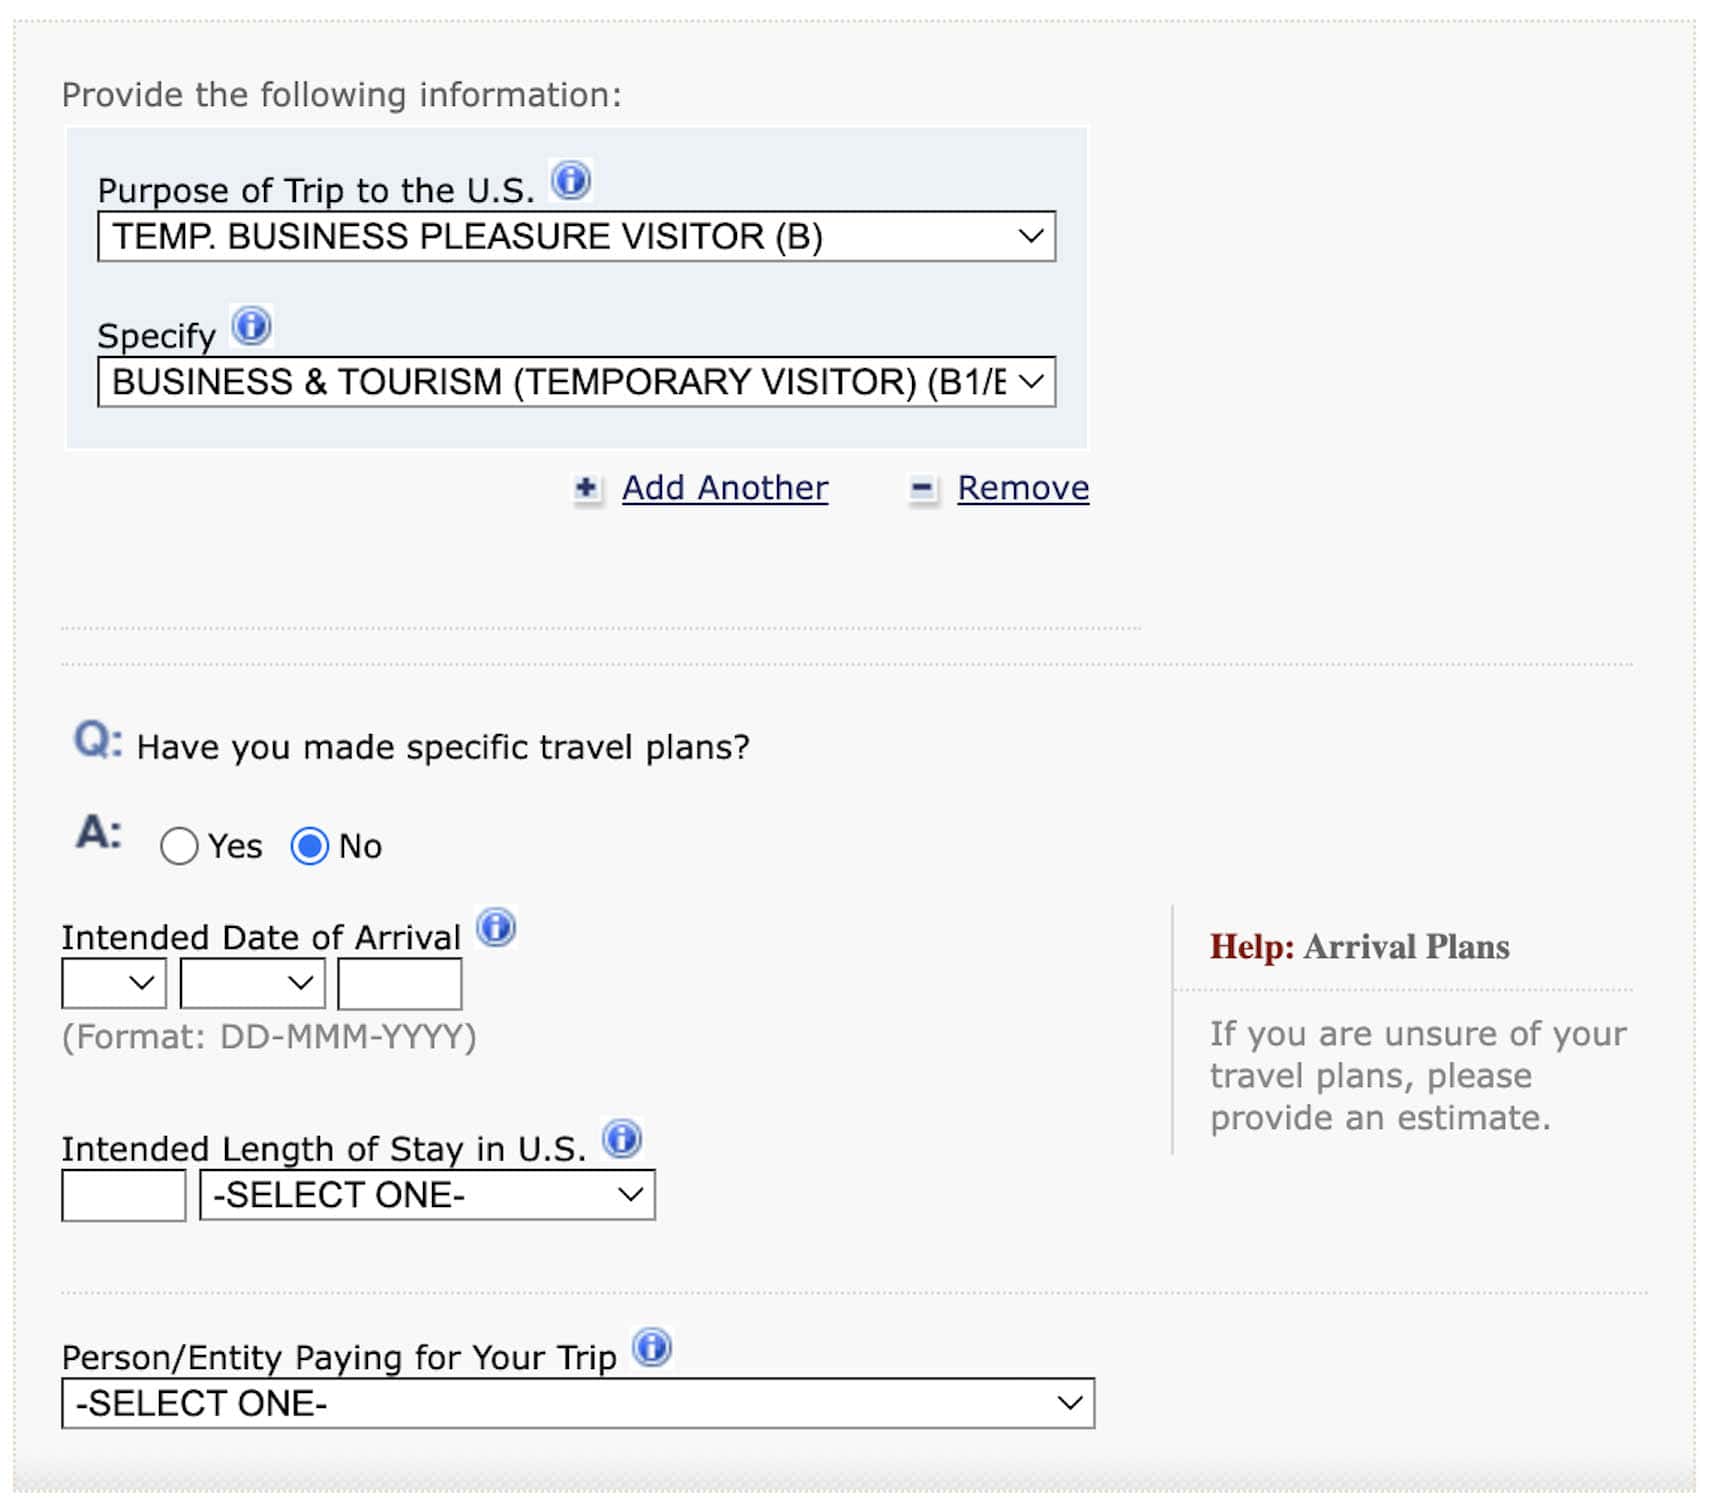
- TRAVEL DETAILS. You’ll be requested to pick the aim of your journey. Since you’re making use of for a B1/B2 visa, select Temporary Business Pleasure Visitor. Under SPECIFY, choose Business & Tourism (Temperoary Visitor).
Under it, provide the main points of your journey. If you have got a concrete journey plan, enter your journey dates. If you haven’t finalized these but, simply decide an meant date of arrival within the US and meant period of your keep.
Please take a screenshot of this half so that you gained’t neglect the main points you entered. The consul/visa officer can be asking you about your journey particulars when it’s time for interview.
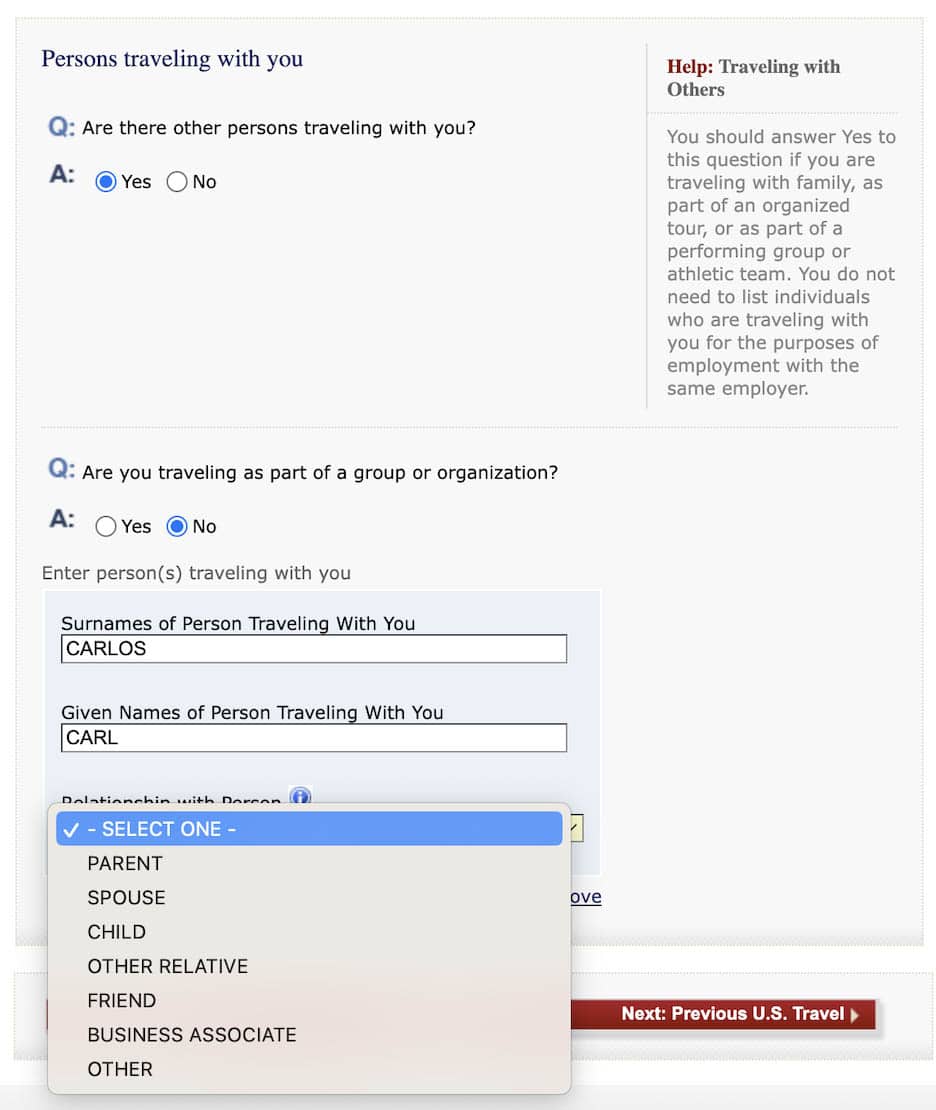
- TRAVEL COMPANIONS. Declare the individuals with whom you can be touring to the United States.
- PREVIOUS US TRAVELS. If it’s your first time touring to the US, simply reply NO. You’ll even be requested for those who’ve been denied a US visa earlier than or denied entry into the nation. Answer honestly as a result of they’ve a file of it anyway.
- ADDRESS. Enter your present handle.
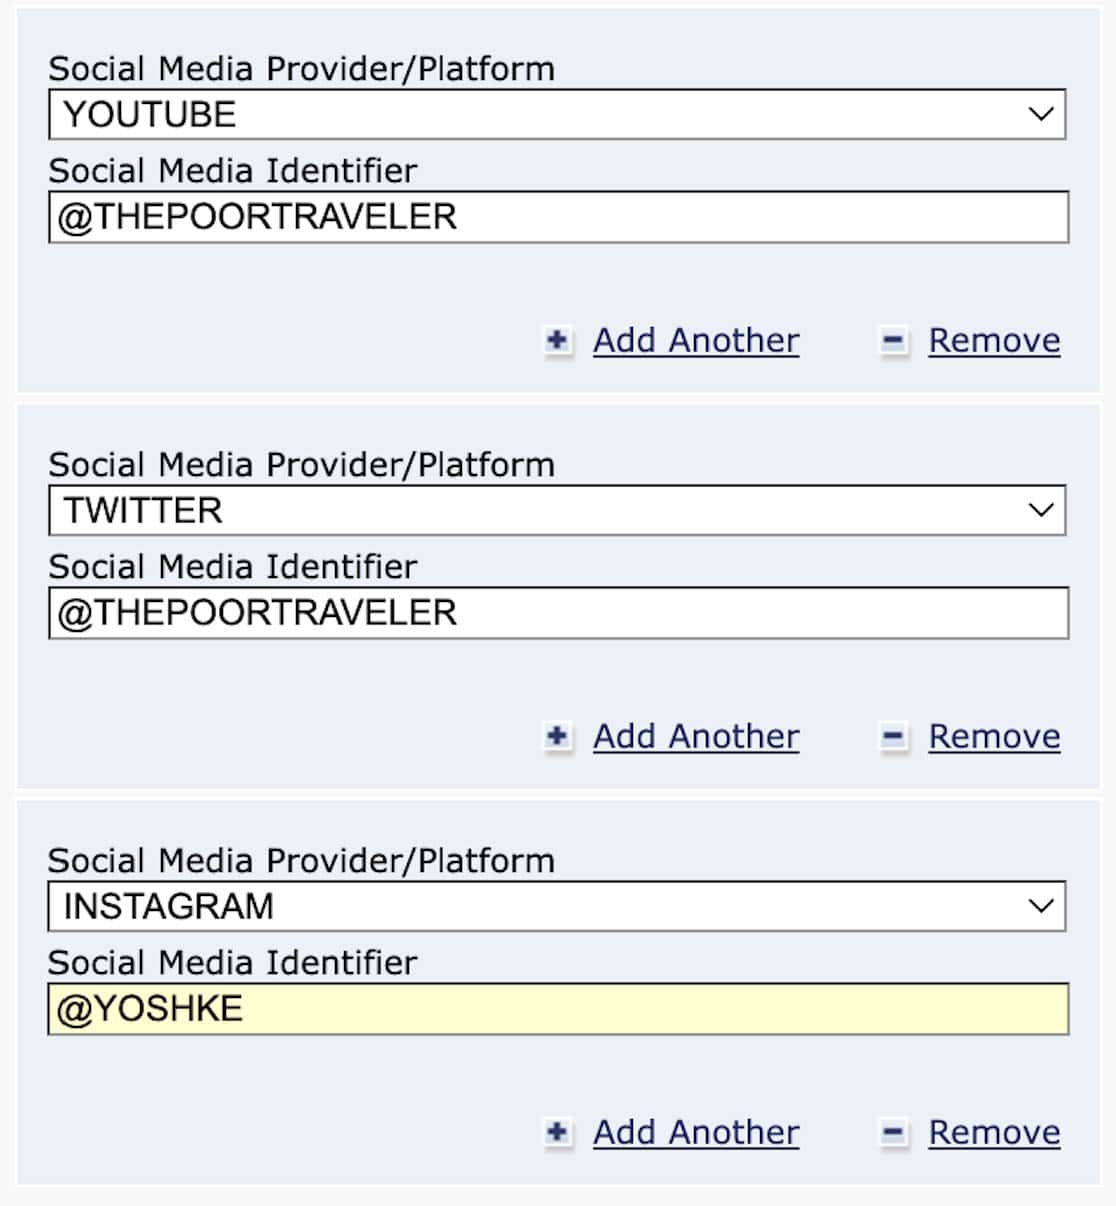
- CONTACT INFORMATION. Aside out of your contact numbers, you’ll additionally want to supply your social media account handles/usernames together with Facebook, X (Twitter), YouTube, and Instagram. You’ll additionally enter your passport particulars right here.
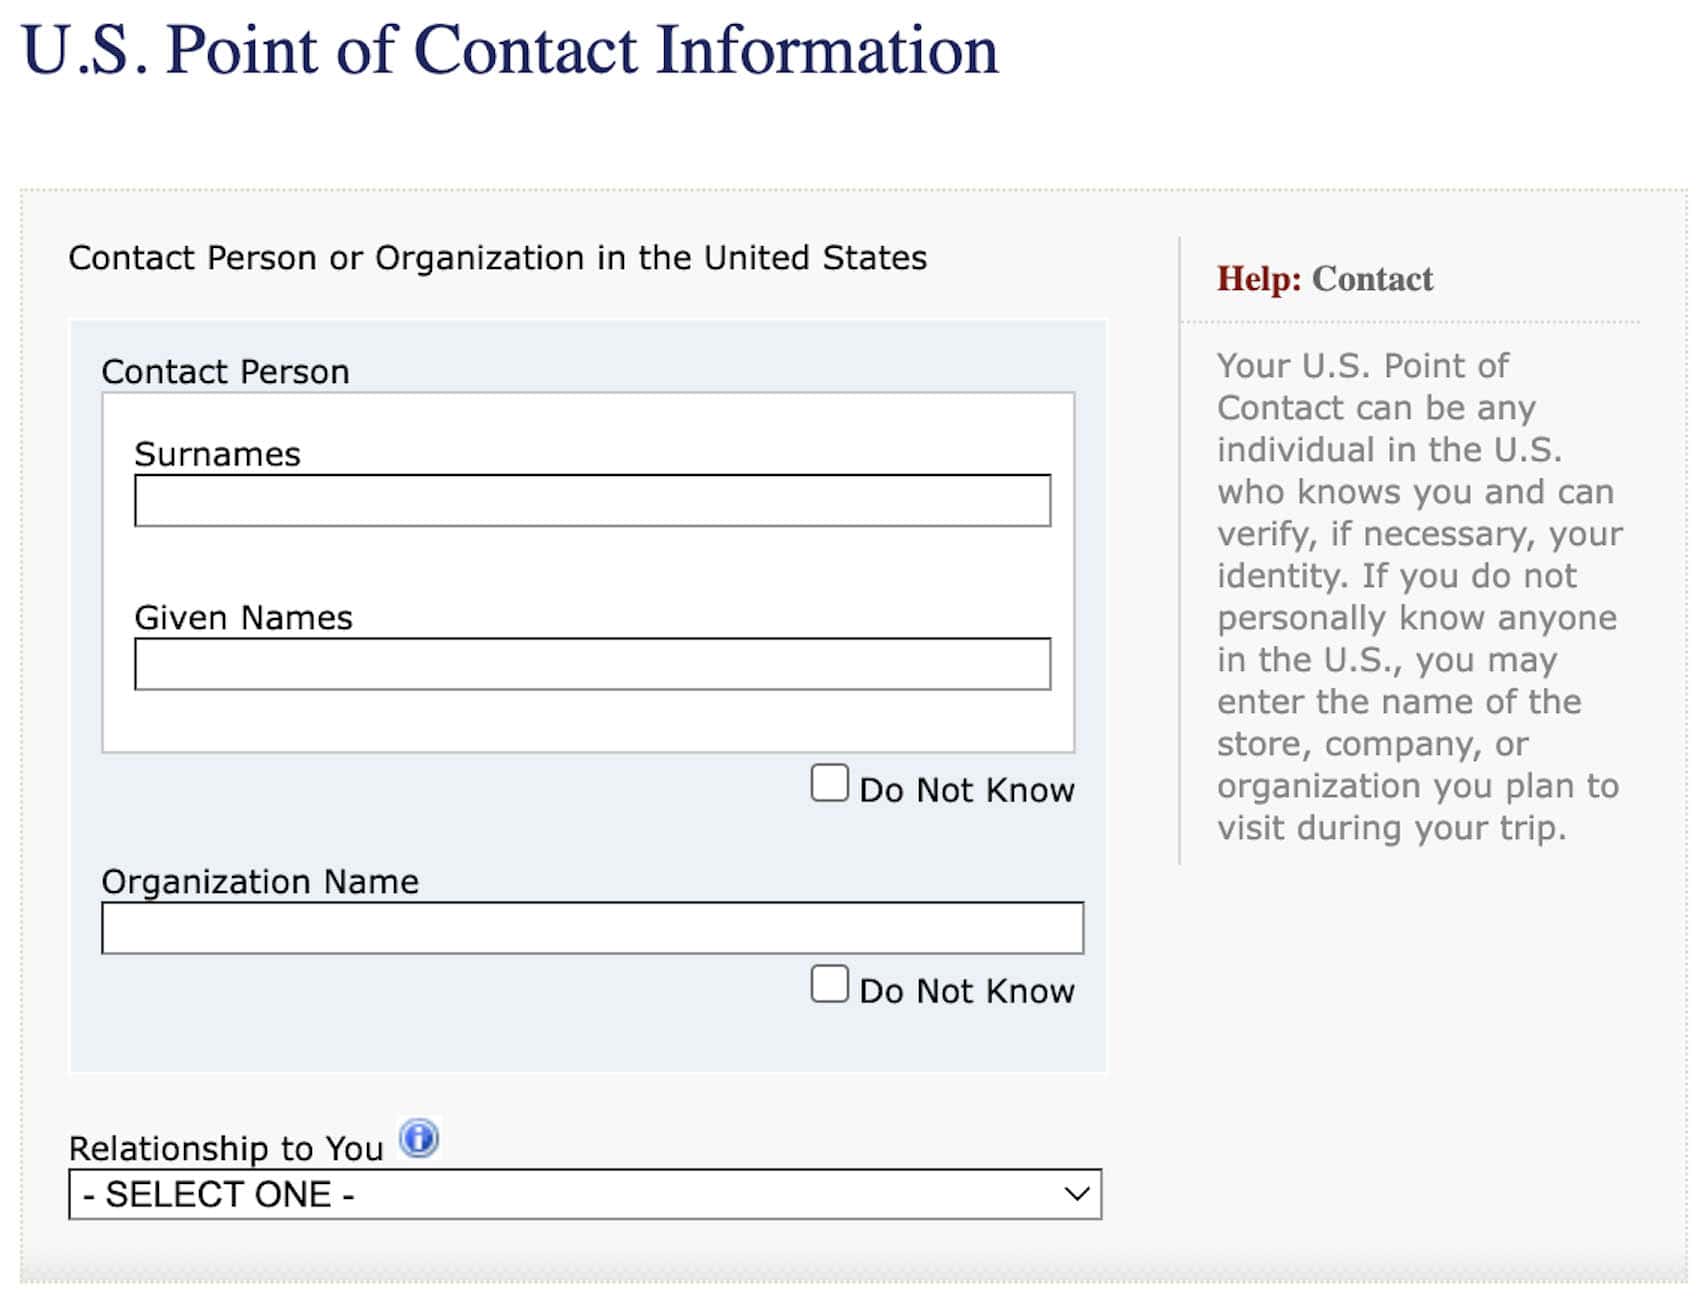
- U.S. CONTACT. If you realize somebody within the US, present their identify and your relationship with them. Ideally, this individual ought to be capable to confirm your identification if deemed mandatory.
- FAMILY. Enter the names and start dates in case your dad and mom. If you have got relations within the United States, you also needs to present their particulars right here.
If you don’t know anybody within the US, simply enter the identify and handle of an institution that you just plan to go to as a part of your journey. It is usually a museum, a theater, or a theme park, so long as it’s a part of your itinerary.
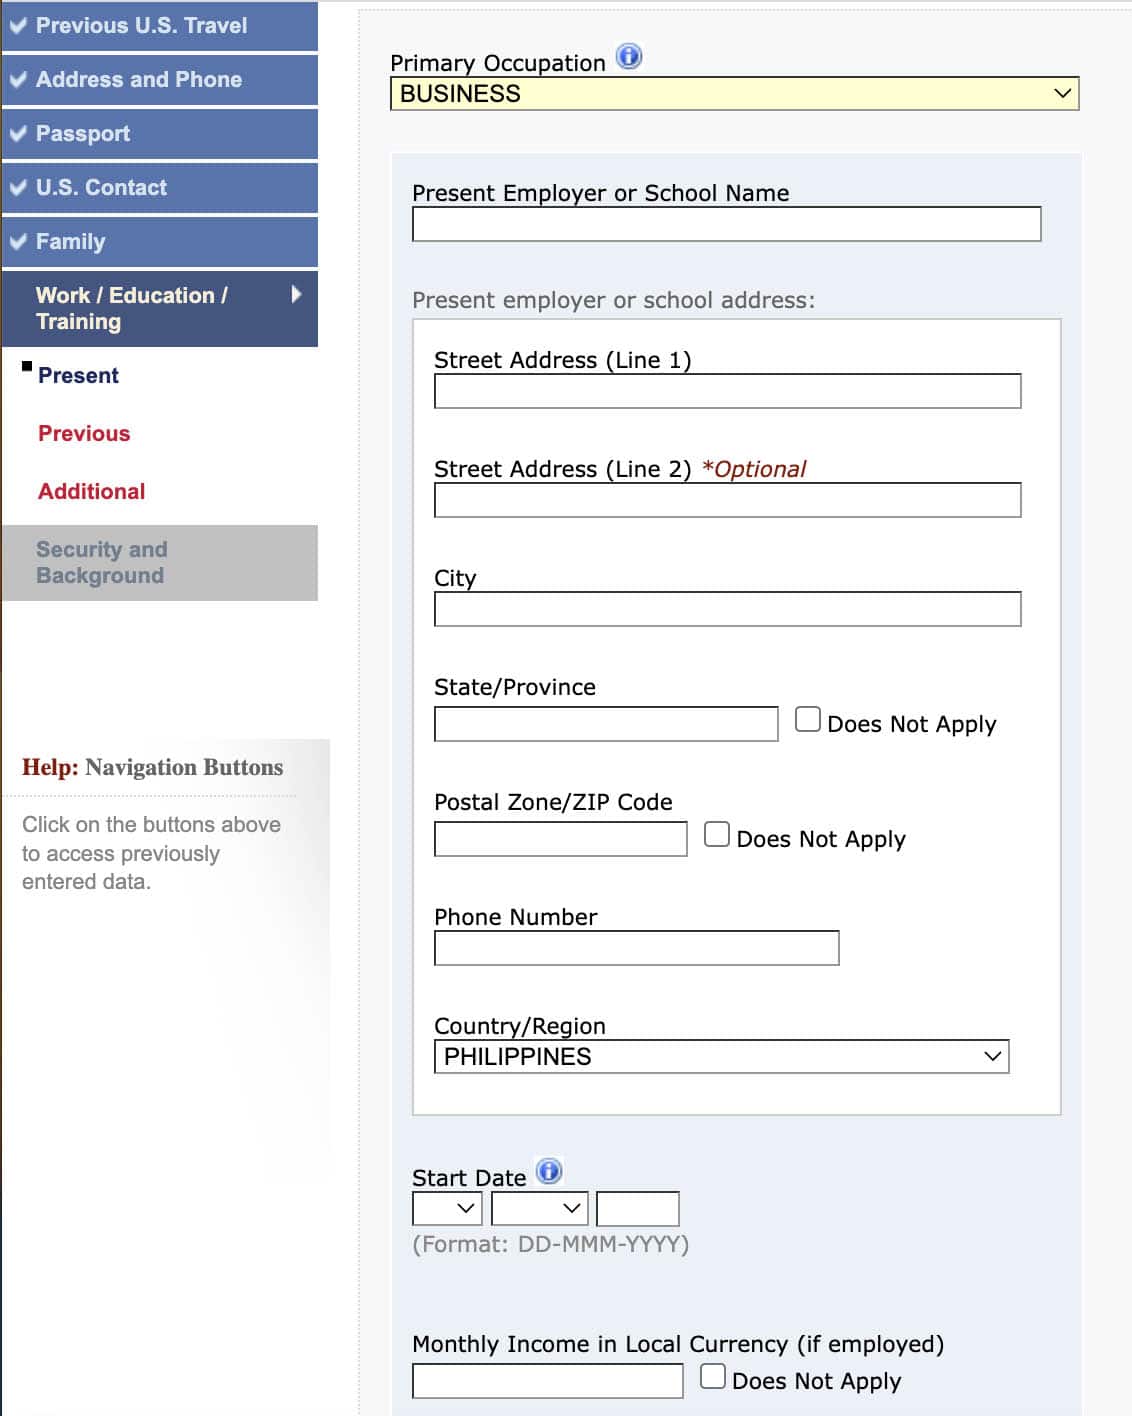
- WORK AND EDUCATION BACKGROUND. List down your present and former employers and work experiences (together with job descriptions) and universities/faculties you attended. Yes, this half really feel such as you’re constructing a CV.
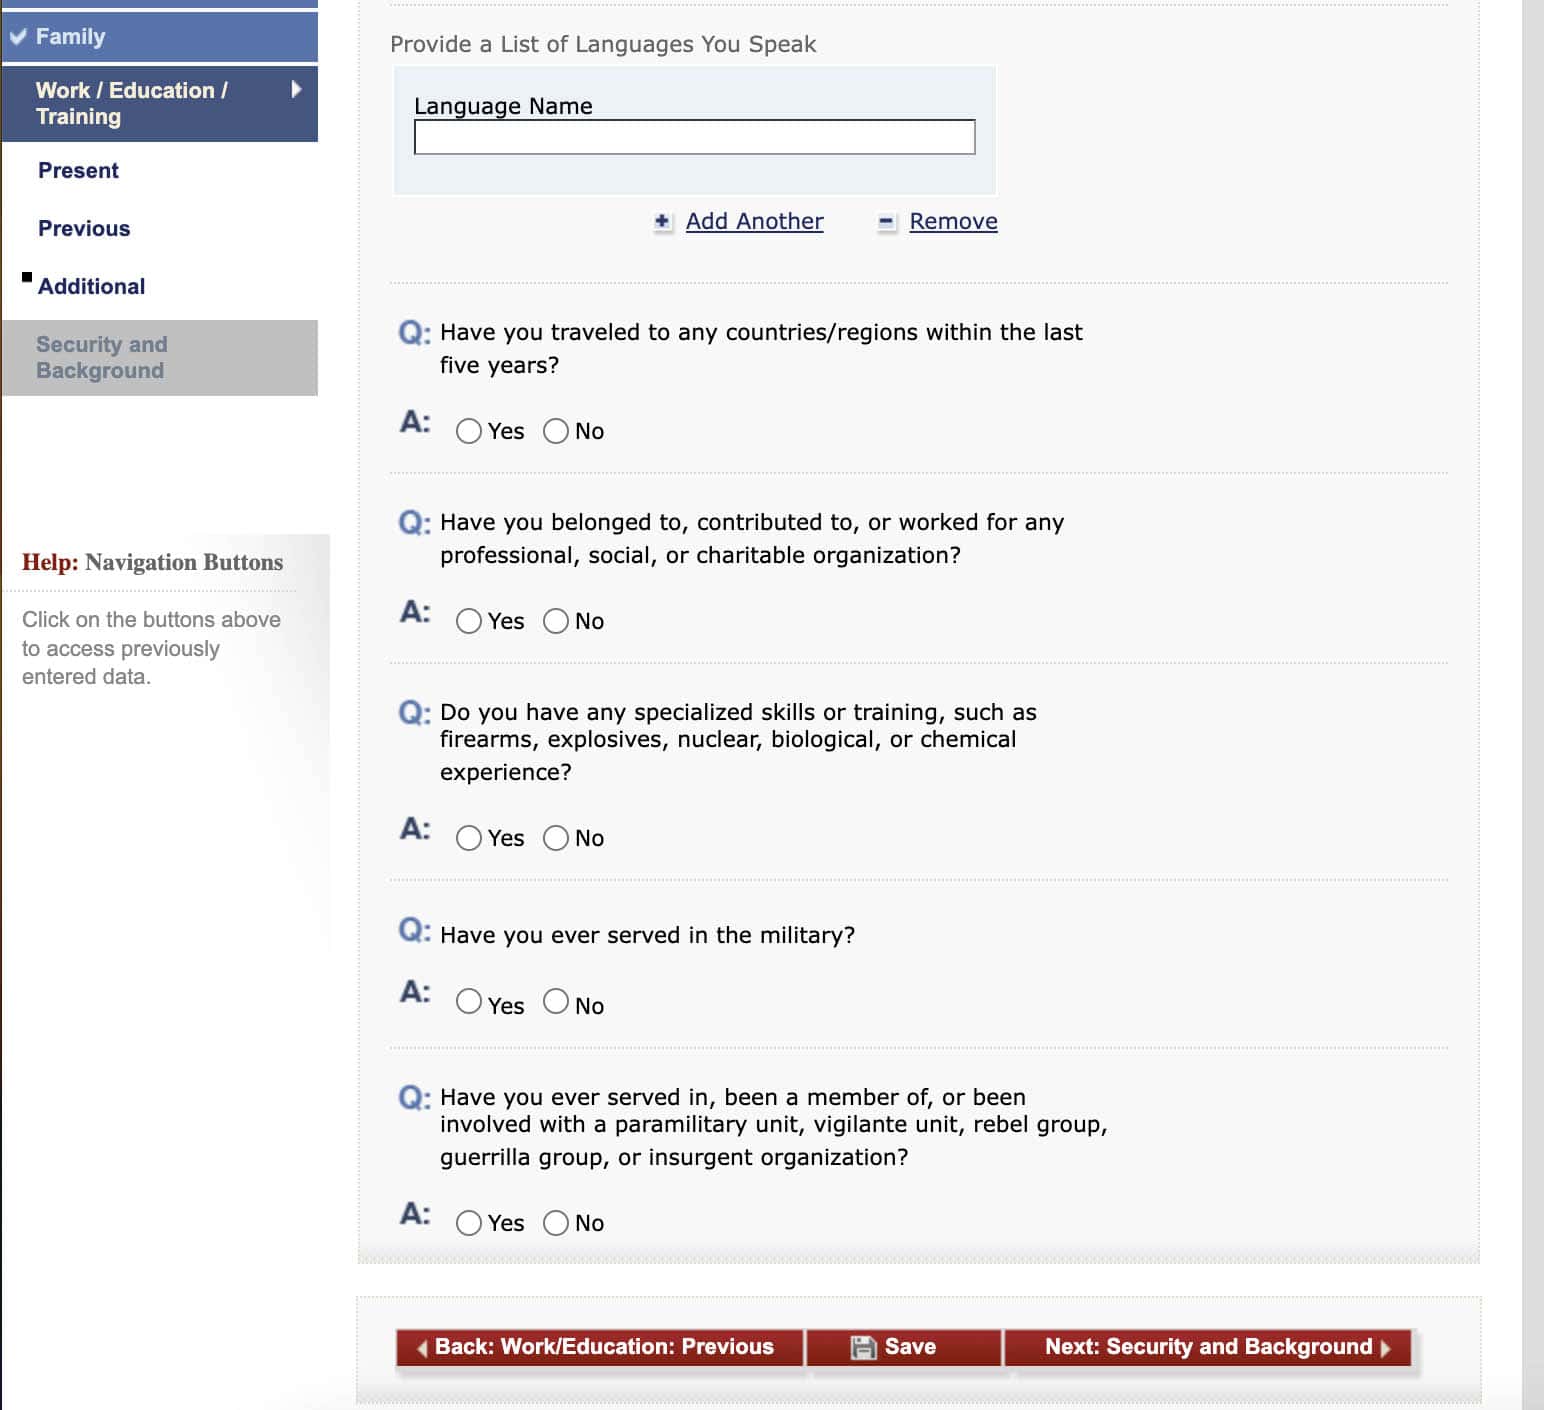
- SECURITY AND BACKGROUND. Last web page! Answer a collection of questions in regards to the nations you visited, organizations you’re affiliated with, and army connections, if any. You’ll additionally reply health-related questions.
After this, you’ll be prompted to UPLOAD A PHOTO. It needs to be in colour and brought inside the previous six (6) months. No eyeglasses, hats, or head cowl (apart from faith or medical causes). The hyperlinks beneath can information you:
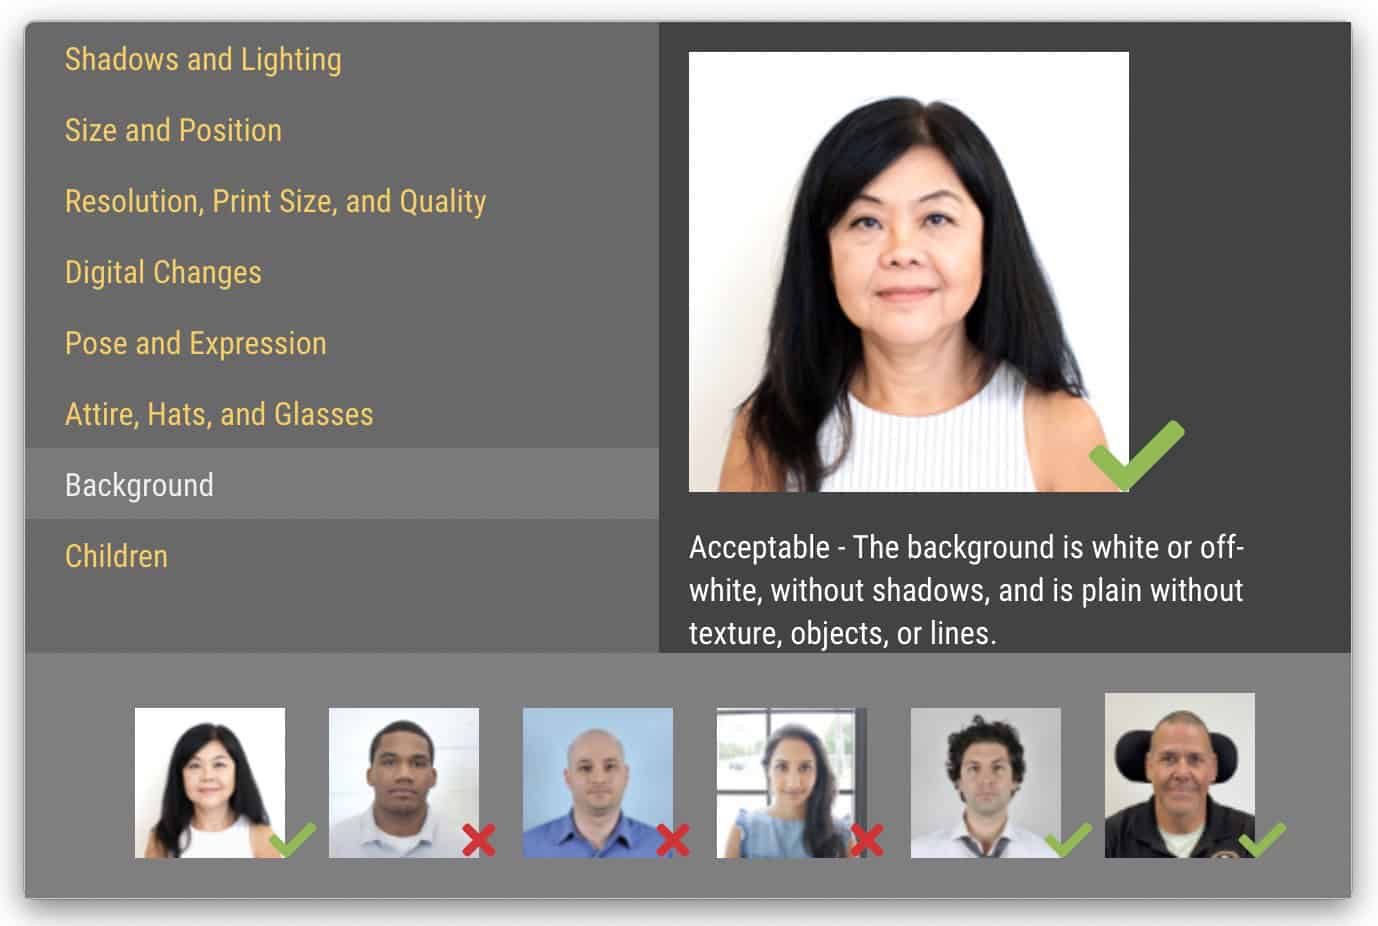
After importing a photograph, overview all the knowledge you equipped. Make positive each single factor is appropriate. If so, submit your software.
⚠️ IMPORTANT! The second you hit SUBMIT, you gained’t be capable to make any modifications to the shape, so guarantee each bit of data is appropriate. If there are nonetheless particulars that it’s good to double-check or verify, you may simply save your software within the meantime and simply return to it when you have already got the right knowledge.
After submitting the shape, the subsequent web page will show your DS-160 CONFIRMATION PAGE, which accommodates your affirmation quantity and barcode. You have the choice to print it out or e mail to your self. (I selected to e mail it to myself so I might get again to it anytime sooner or later.)
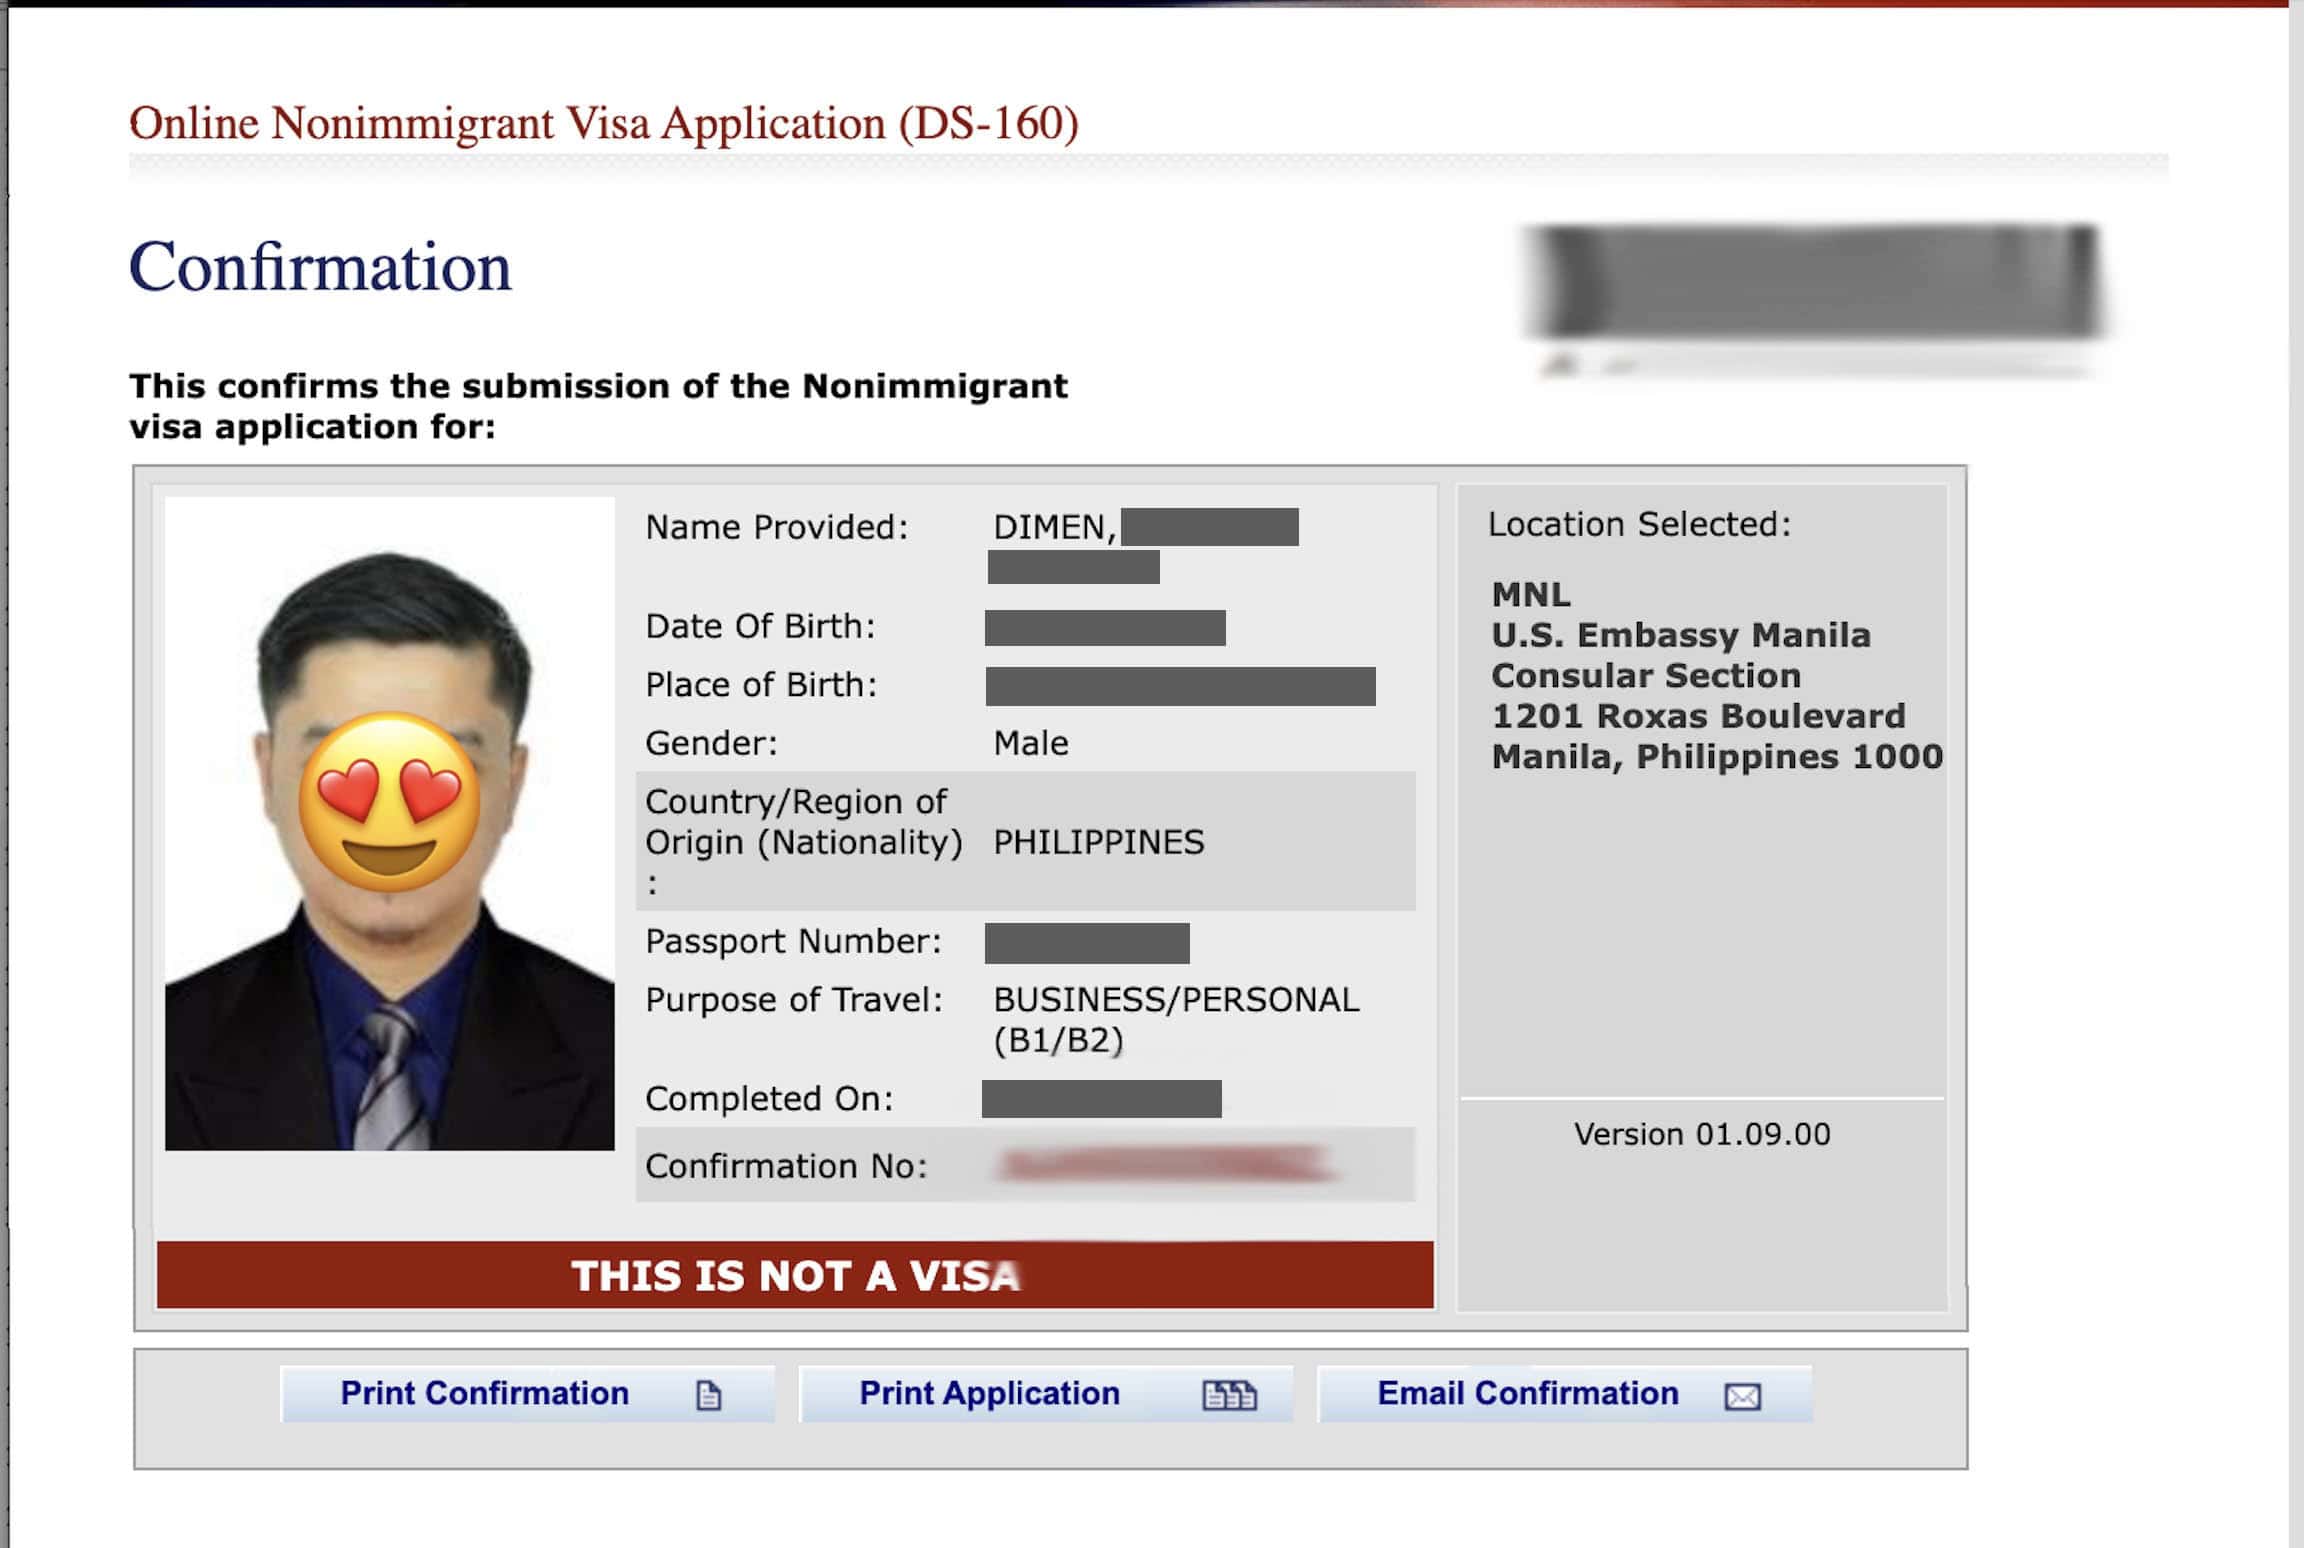
You’ll must current this DS-160 Confirmation Page on the U.S. Embassy when it’s time to your interview.
Step 3: PAY THE VISA FEE.
The U.S. Visa price prices USD 185 (roughly PHP 10,800 on the time of this writing).
There a number of methods to settle this price however I selected to pay through PesoNet.
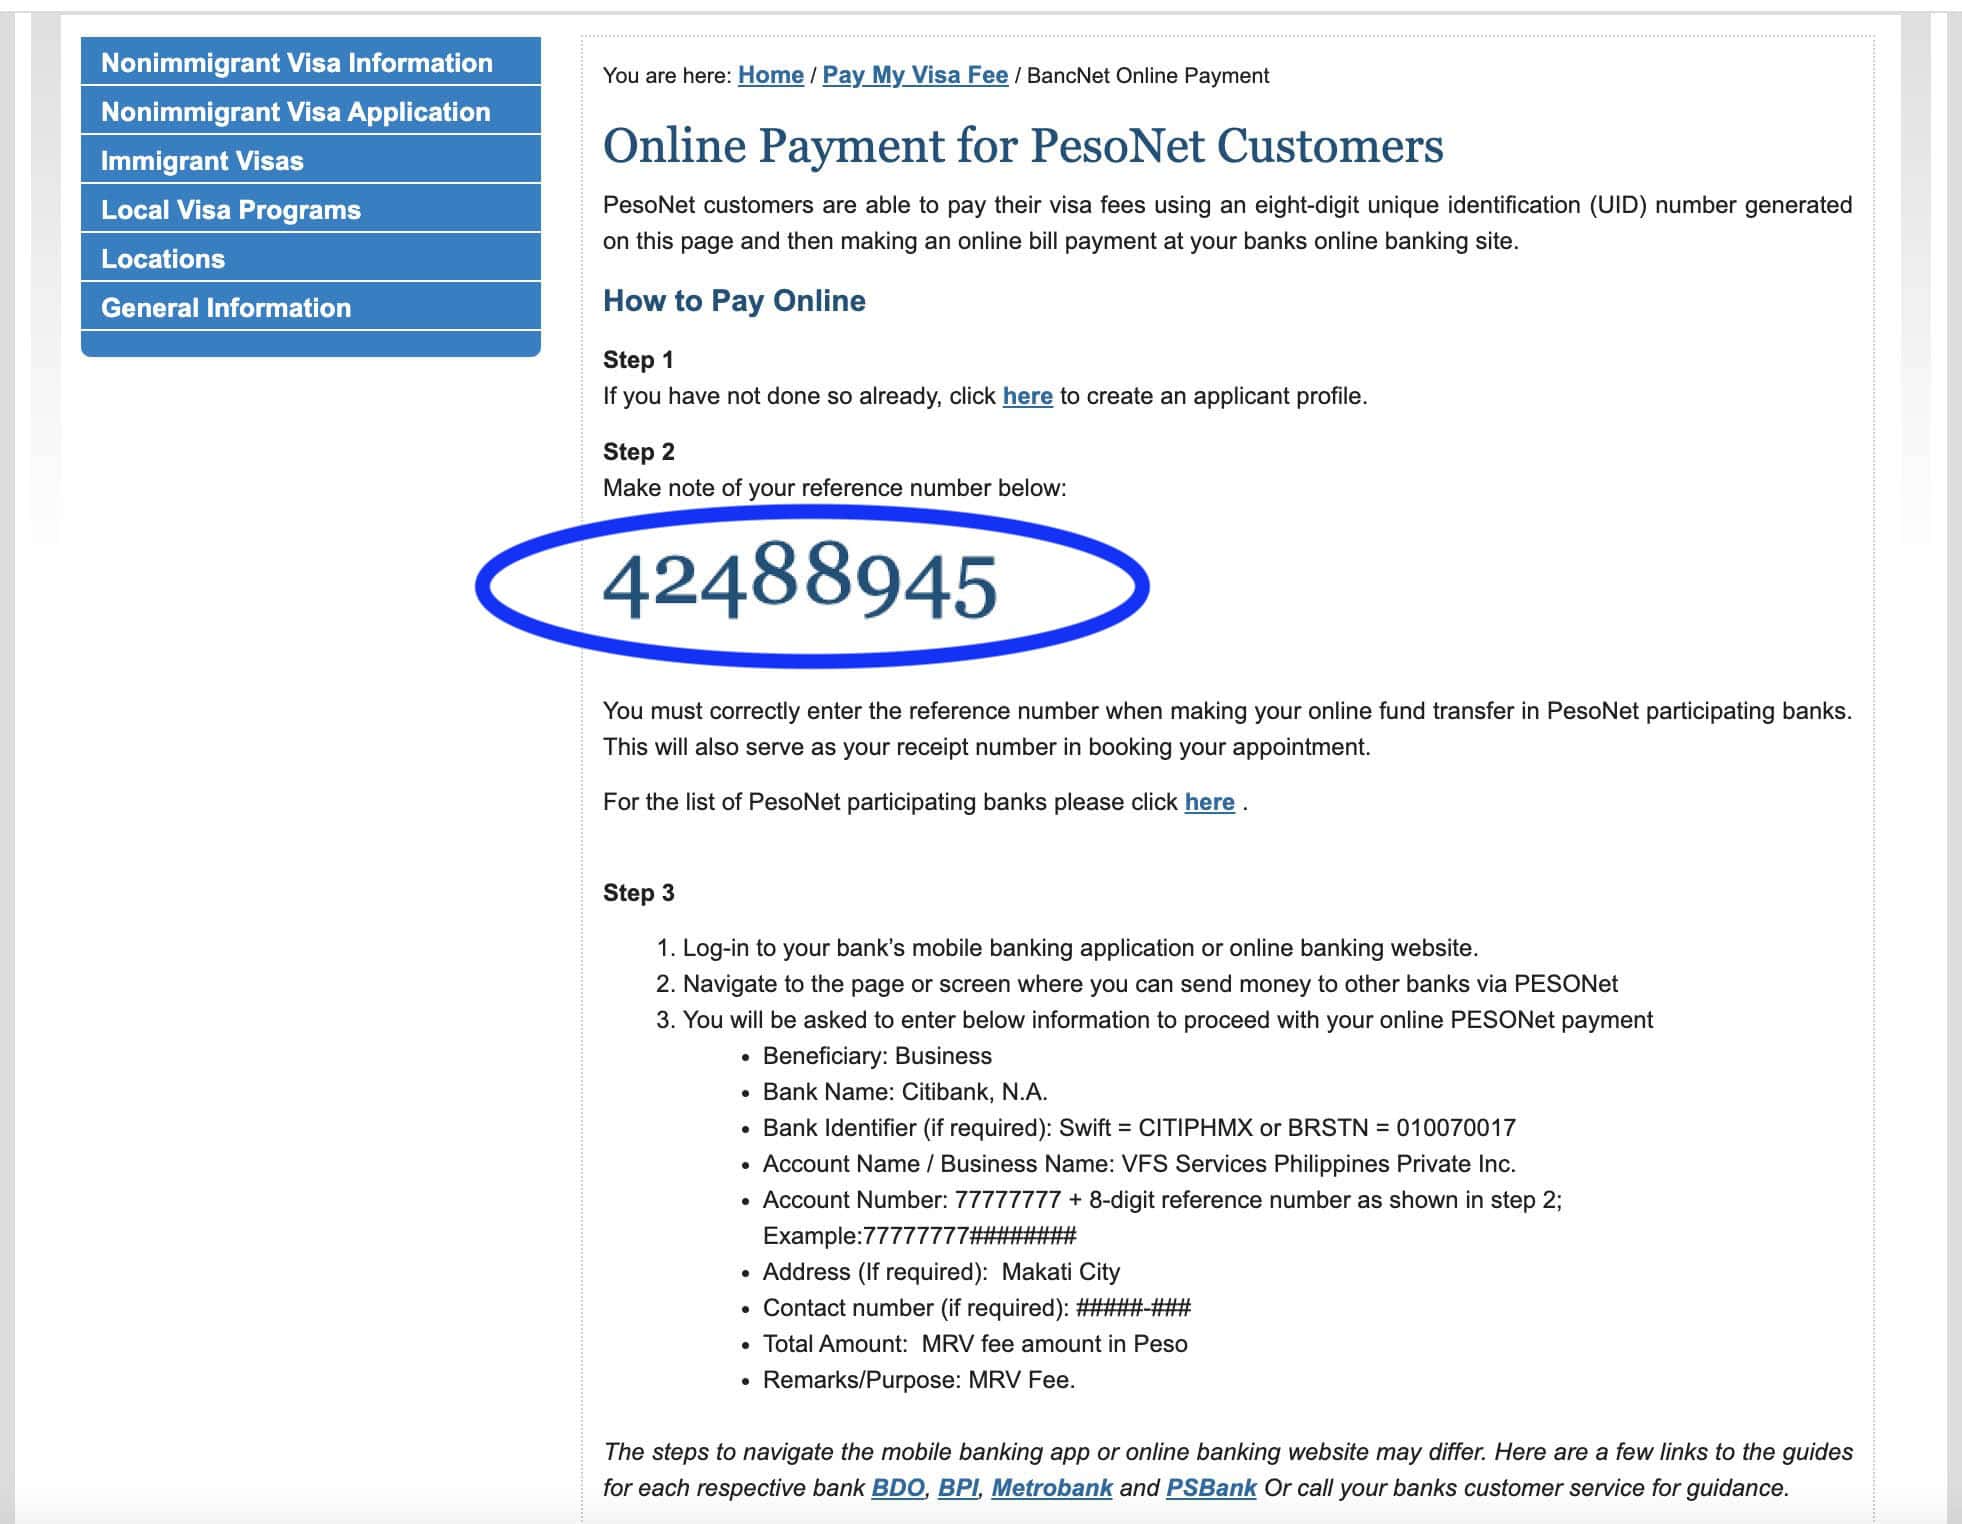
- Log on to this USTravelDocs web page. As quickly because the web page masses, it would generate a reference quantity.
- Save the reference quantity. You can take a screenshot of it or copy-paste it someplace. You’ll want this quantity when it’s time to ship the fee.
- Follow the step-by-step fee directions on the backside of the web page. Because we’re speaking about paying an enormous quantity right here, no want for me to repost the steps right here as some particulars would possibly change sooner or later. Just observe the steps on the web page to a tee, ensuring that you just’re getting into the right reference quantity.

That’s it! It would possibly take some time for the fee to replicate within the system. According to the web site, it ought to register on the subsequent enterprise day, after 1:30 PM.
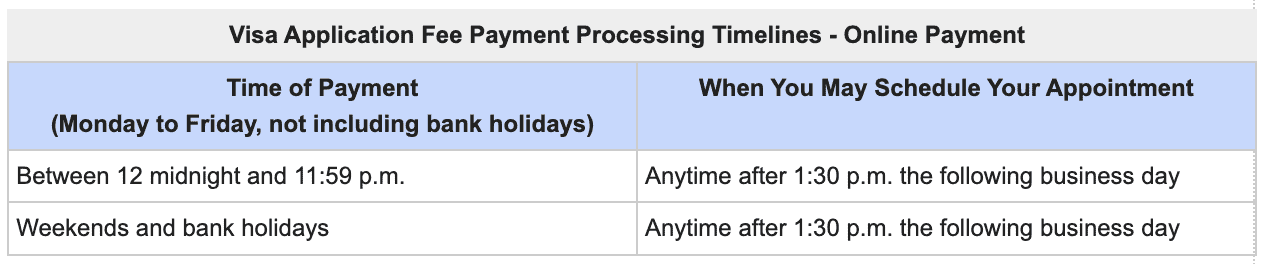
But in my case, I needed to wait a pair extra days earlier than I might transfer on to the subsequent step.
Step 4: BOOK AN APPOINTMENT.
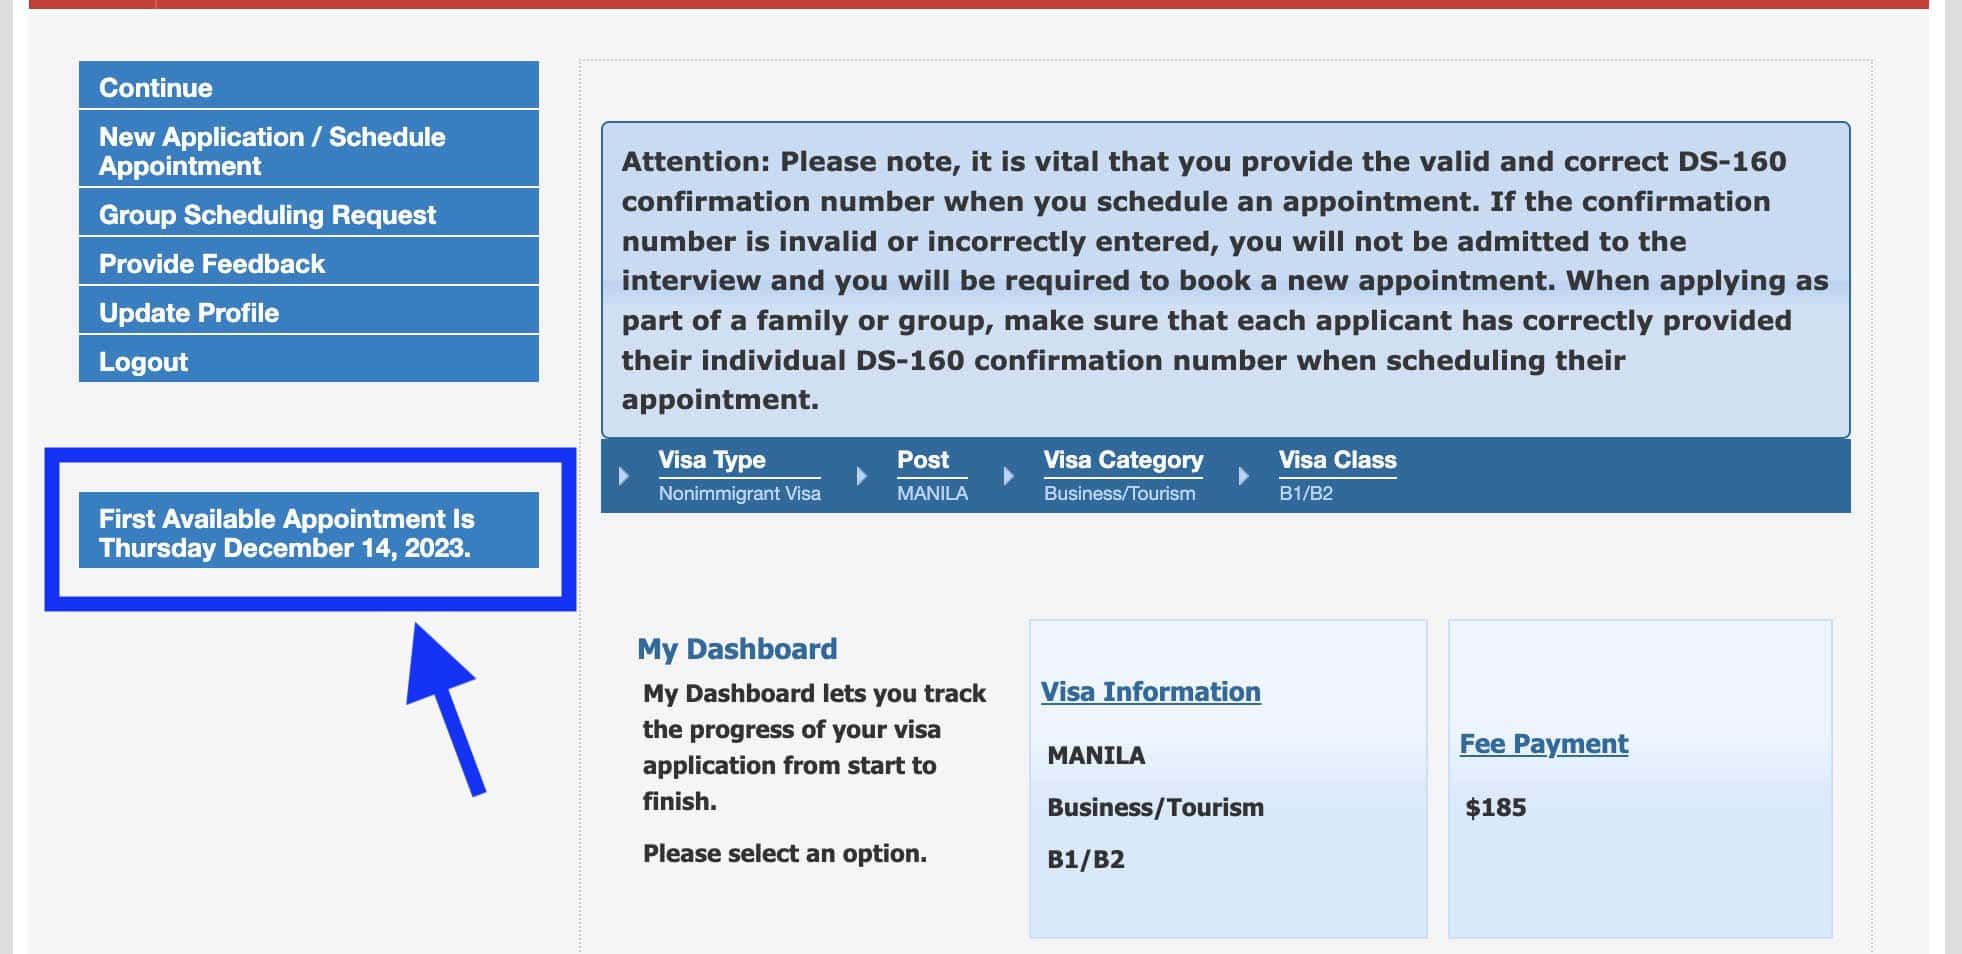
Assuming your fee is already within the system, chances are you’ll now ebook an interview appointment. Log into your USTravelDocs.com account on this web page. This is identical portal on Step 1.
On the left sidebar, it would show the earliest obtainable appointment date. This may be months from now. In my case, I utilized in September however the earliest obtainable schedule was in January of the subsequent yr. But don’t lose hope. Every at times, some candidates cancel their appointments and new slots open up. We discovered that this normally occurs within the wee hours of the evening. True sufficient, after staying up at evening, we have been capable of snag an appointment in October, which was only a month away.
Anyway, for those who’re lastly able to ebook an appointment, simply observe these steps:
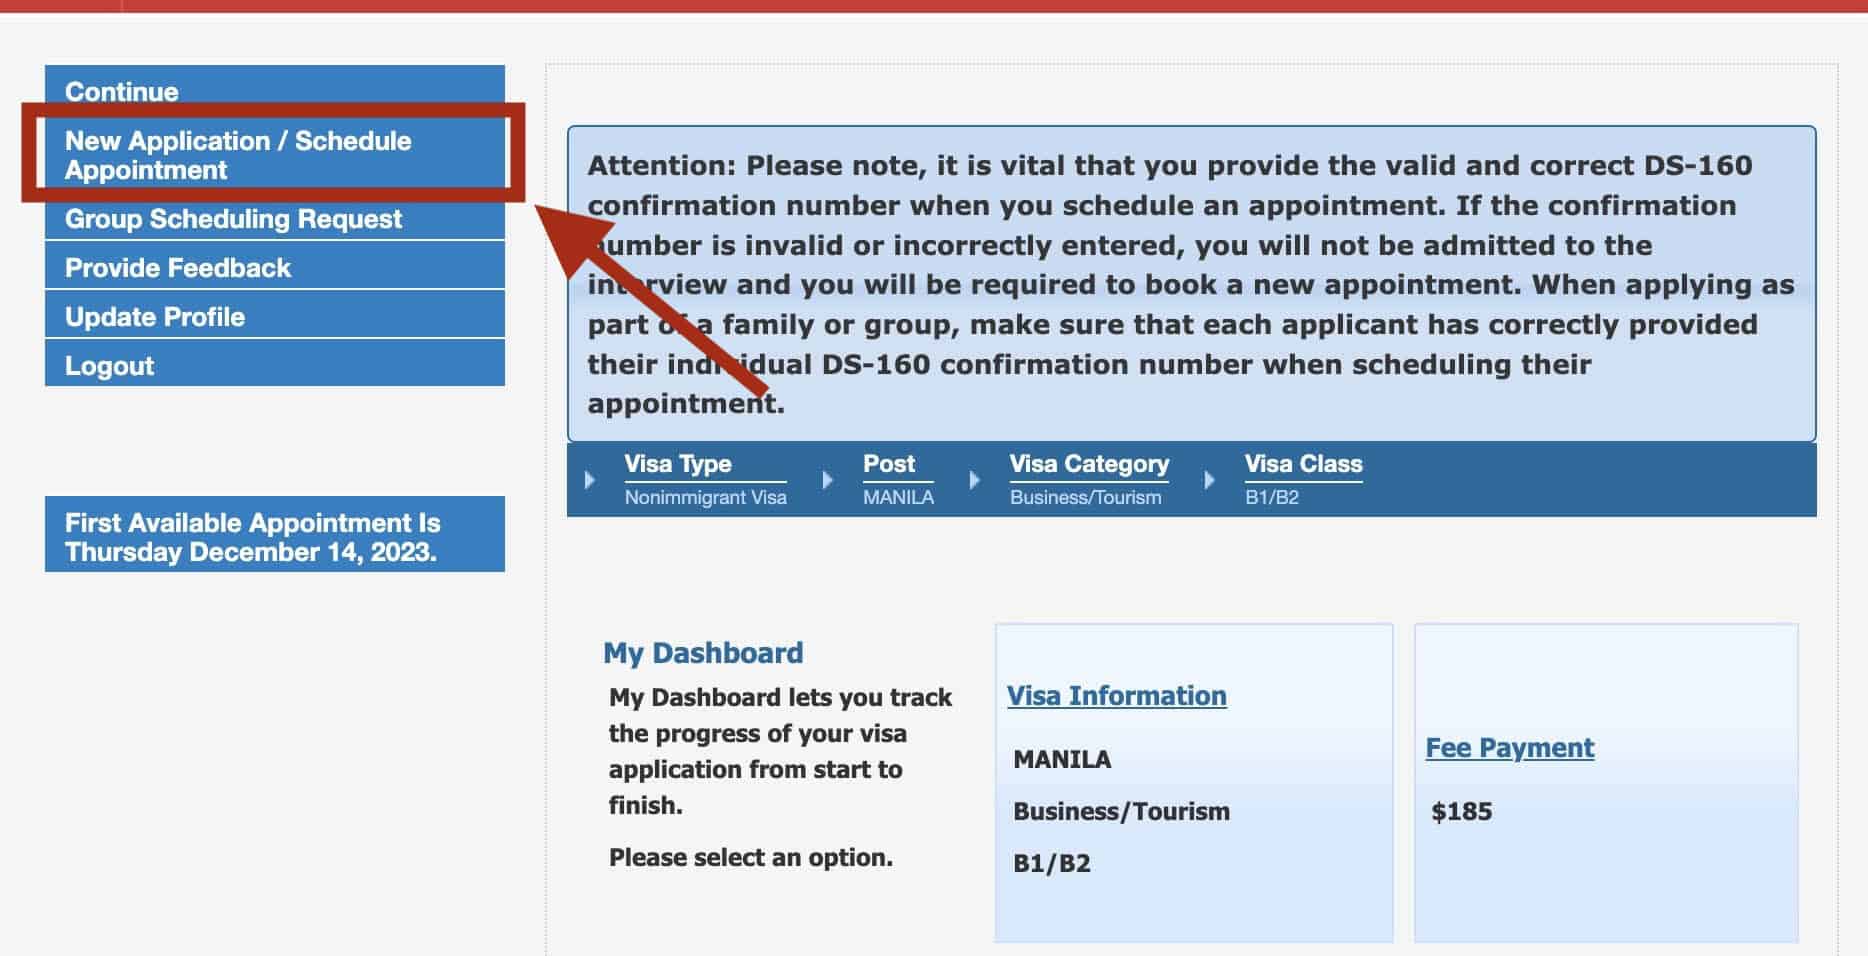
- Click on NEW APPLICATION/SCHEDULE APPOINTMENT on the left sidebar. On the subsequent web page, choose NONIMMIGRANT VISA after which choose BUSINESS/TOURISM.
- Fill out the subsequent type along with your private particulars and your DS-160 Confirmation Number. Make positive you’re getting into the right quantity as a result of the system will use it to hyperlink your appointment to the best DS-160 type. If you have got dependents who can be with you on the interview, enter their particulars and their very own DS-160 affirmation numbers.
- Choose the way you need to obtain your passport again: FREE PICK UP or DELIVERY. The latter entails a separate price, to be paid money upon supply.
- On the PAYMENT web page, enter your RECEIPT NUMBER. If your visa price fee is already within the system, you need to be capable to ebook an appointment. Otherwise, simply come again to this web page one other time. Don’t fear, it can save you all the data you entered so that you gained’t must fill out the shape once more while you log in once more.
- Select the date lang that greatest works for you. You can change or reschedule it later for those who discover a higher date.
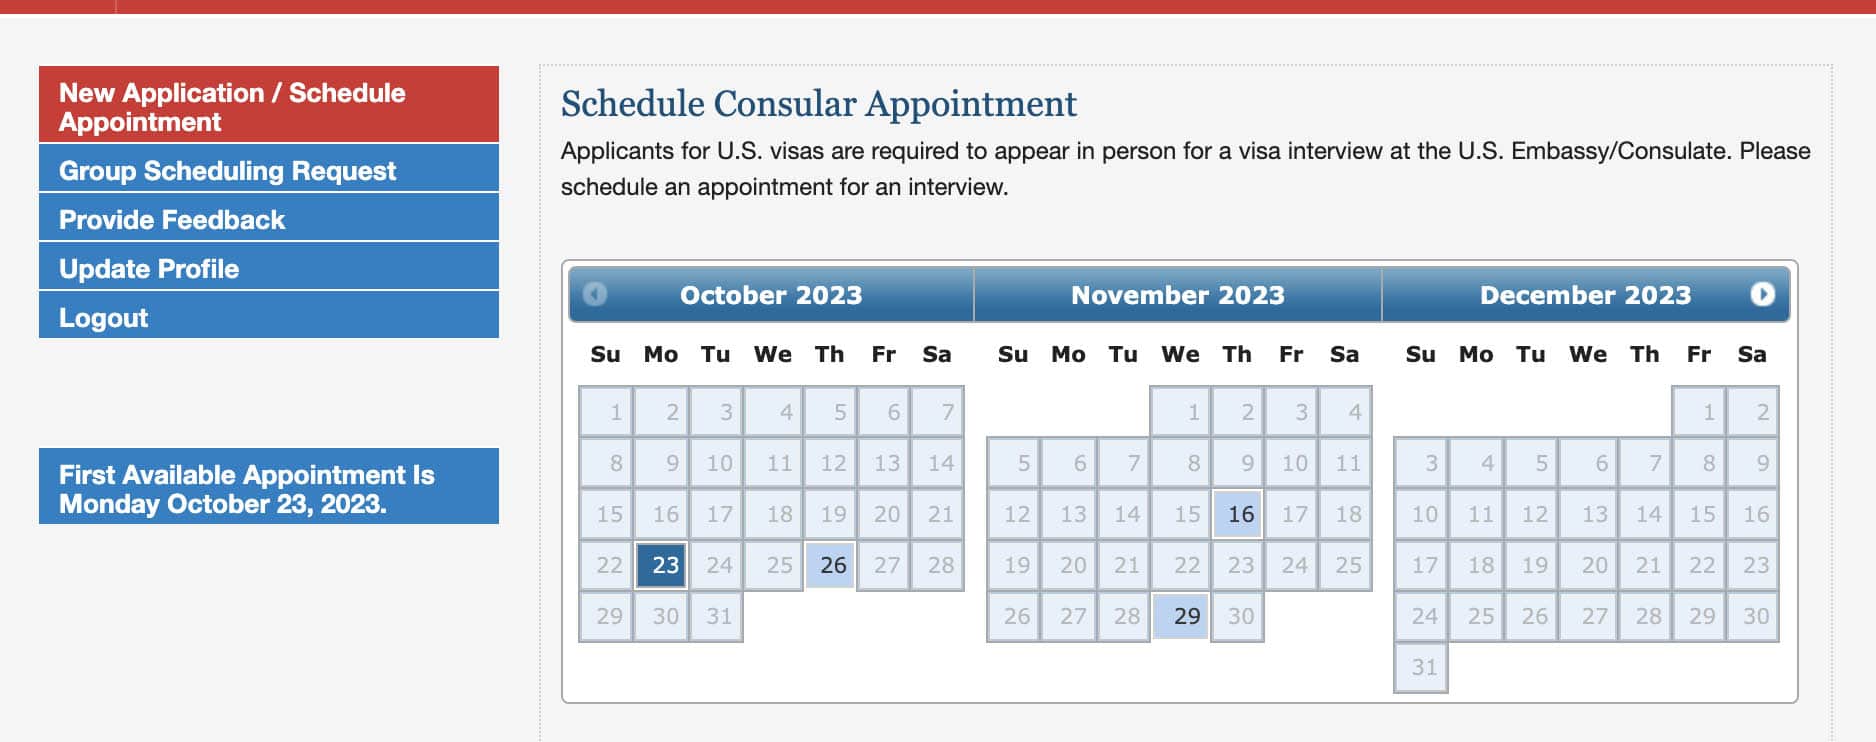
That’s it! You have already got an appointment.
USEFUL TIPS:
- You can reschedule your appointment. Just click on on the RESCHEDULE APPOINTMENT button on the left sidebar and choose an earlier or later date. Yes, it’s doable to probability upon an earlier schedule. That’s what occurred to me.
- GROUP APPOINTMENT possibility is on the market, however I haven’t tried it but, so I do not know the way it works. But for those who’re making use of with a gaggle, attempt clicking the GROUP SCHEDULING REQUEST button on the left sidebar.
Step 5: GATHER THE U.S. VISA REQUIREMENTS.
While ready to your interview appointment date, collect all of the required paperwork.
- Valid passport
- Appointment affirmation web page
- DS-160 affirmation quantity
- your MRV price fee receipt quantity
- Recent ID photograph (2×2)
- All your outdated passports
- Proof of revenue, property possession, ITR
- Letter out of your employer detailing your place, wage, and so on.
- Travel itinerary
Those are the essential necessities. In many instances, these three are all you want. BUT — and it’s an enormous however — it’s greatest to have all the opposite doable supporting paperwork listed on the embassy’s web site:
And others, relying in your goal of journey. See screenshot of the official web site beneath:

I indicated “possible” supporting paperwork as a result of in some situations, they don’t ask to see these docs. In reality, I accomplished and introduced all of those however they didn’t examine any of those, aside from my passport and appointment affirmation. In Vins’s case, the one different factor they checked was his 2×2 photograph.
But it doesn’t imply that you just’ll expertise the identical. Some of the candidates subsequent to me on the road have been requested to current a few of these supporting paperwork. It’s actually greatest to be ready.
By the way in which, for those who discover: the US Embassy doesn’t require financial institution certificates, financial institution statements, or any proof of funds. They’re not on the record, so don’t hassle. It’s not wanted in any respect.
Step 6: INTERVIEW
On the day of your appointment, present up on the U.S. Embassy for the interview. Here’s the handle:
Embassy of the United States of America
1201 Roxas Blvd, Ermita, Manila, 1000 Metro Manila
Arrive at the very least quarter-hour earlier than your schedule. Actually, they begin letting candidates in an hour earlier than the indicated schedule.
Traffic is horrible in Manila, so allot loads of lead time. If you’re coming from distant — particularly for those who’re flying in from the province — and also you’re searching for a spot to remain, contemplate a lodge that’s near the U.S. Embassy. There are lots of good decisions within the surrounding space. SEARCH FOR MANILA HOTELS HERE! ✅
But keep in mind these:
- Gadgets or objects with batteries and ON-OFF swap are NOT ALLOWED inside. Yes, that features cell phones, tablets, laptops, and even digital watches (Apple watch, and so on.).
- Food, sharp objects, crayons, and markers are additionally prohibited. You could also be refused entry and your account could also be locked for 30 days for those who’re caught sneaking any of those in.
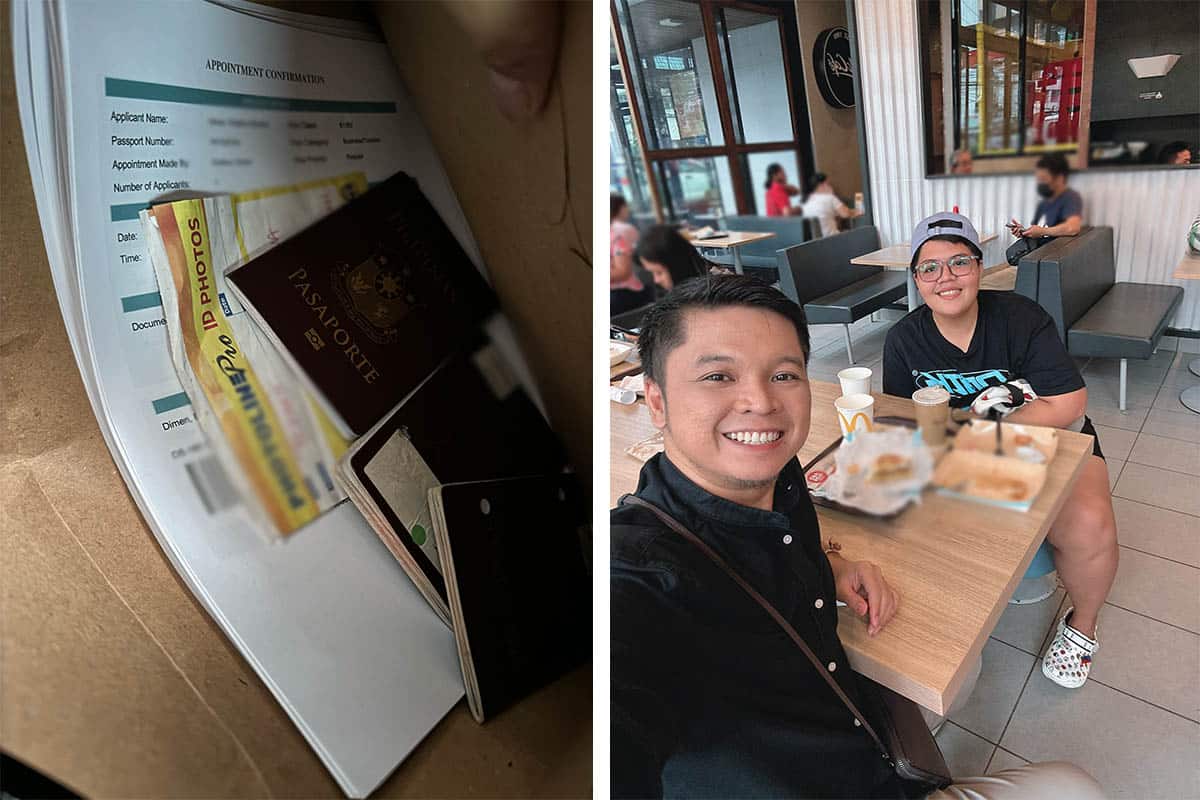
- No lockers or baggage counters within the neighborhood. The smartest thing to do is to go along with a companion and ask them to attend for you someplace shut. There’s a Starbucks cafe and McDonald’s on the opposite aspect of the street. Just agree to fulfill at a sure time, old-school-style.
Once you’re gadget-free, chances are you’ll now go inside. You’ll must fall in line each step of the way in which. Here are the steps:
- Present your printed appointment affirmation web page on the employees exterior. They will affix a sticker with a QR code on the again cowl of your passport.
- Enter the constructing for the safety examine. They are very thorough, so don’t try to sneak in something prohibited.
- Follow the indicators and the employees to the subsequent constructing. You could also be requested right here to current your passport and a few of your necessities. In my case, they solely checked my passport. In Vins’s case, passport and a pair of×2 ID photograph.
- Undergo biometrics scan. They will take your fingerprints at one of many counters. After that, you’ll be assigned one other counter for the interview correct. Queue up at that counter and wait to your flip.
- Interview correct. This normally simply takes round 5 minutes. It’s very fast as a result of likely, purposes have been evaluated even earlier than the interview. It’s very doubtless that they have already got a tentative determination previous to your appointment and the interview is only for validation or to settle any doubts, if any. It can be a possibility to examine supporting paperwork ought to they really feel the necessity to. In my case, they didn’t examine something. But a few of the different candidates within the space have been requested to current supporting docs. I’ll share all of the questions within the subsequent part beneath.
– If your software is authorised, they’ll take your passport so they may affix the visa sticker.
– If your software is rejected or denied, they’ll inform you proper then and there. (Yes, inside listening to vary of different candidates on the queue.)
Step 7: WAIT FOR YOUR VISA!
You ought to obtain your passport with a visa only a few days after your interview.
In my case, I acquired mine by means of LBC Padala simply 2 days later. If I used to be interviewed on Monday, I acquired the visa on Wednesday morning. I paid PHP 440 upon supply.
If you selected PICKUP while you booked an appointment, chances are you’ll declare your passport/visa at LBC Mall of Asia.
U.S. VISA INTERVIEW QUESTIONS
Here’s a rundown of all of the questions the consul/visa officer requested me in the course of the interview.
- Where within the US are you going?
- What’s the aim of the journey?
- How lengthy is the journey?
- Are you married? Do you have got children?
- With whom are you touring?
- What do you do for a dwelling?
- How lengthy have I been doing this job?
- What’s the identify of your employer?
That was it. Eight questions. Or 9. Vins acquired even fewer questions: six.
The officer’s tone was very informal and pleasant, so I responded in the identical vogue.
After the final query, the officer typed one thing on the pc, confronted me once more, and mentioned, “OK, your visa is approved. We’ll just mail the passport to you.”
But as a result of the interview is carried out in an open space, whereas I used to be in line, I might really hear the questions that the opposite candidates have been getting. These embrace:
- Will you be visiting somebody within the US?
- Have you visited different nations earlier than?
- Where in (state) are you going?
⚠️ IMPORTANT! These questions that the officers/consuls are asking are the identical questions on the DS-160 type, so it’s essential that you realize and keep in mind the solutions you entered while you have been carrying out it on-line. They’re not asking as a result of they need to know — they already know — however they most likely are simply attempting for verify or take a look at in case your solutions are constant.
The drawback is, when lots of time has handed between the day you achieved the DS-160 type and the day of your interview, it’s straightforward to neglect the main points. So make a copy of your solutions on the DS-160 type.
There you have got it. That’s the complete U.S. visa software course of as I skilled it.
Before I finish this text, I simply need to commend the individuals working on the U.S. Embassy for the graceful course of and nice expertise. From the Filipino employees and the American interviewers, each one was pleasant, mild, and respectful. Even once they have been delivering rejections, they did it in a means that weren’t condescending or belittling. At different embassies, I’ve seen fairly excessive horses when making use of for a visa, so this was actually a breath of contemporary air. Kudos to all the employees on the US Embassy!
Where to Stay Near the U.S. Embassy Manila
If you’re coming from the province and also you need to spend the evening at a lodge near the U.S. Embassy, listed here are some properties across the space.

Search for extra Manila Hotels!

More Tips on YouTube ⬇️⬇️⬇️
Is this put up useful to you?

[ad_2]